Storage
볼륨(Volume)
컨테이너가 외부 스토리지에 액세스하고 공유하는 방법
포드의 각 컨테이너에는 고유의 분리된 파일 시스템 존재
볼륨은 포드의 컴포넌트이며 포드의 스펙에 의해 정의
독립적인 쿠버네티스 오브젝트가 아니며 스스로 생성, 삭제 불가
각 컨테이너의 파일 시스템의 볼륨을 마운트하여 생성
볼륨의 종류
| 임시 볼륨 | 로컬 볼륨 | 네트워크 볼륨 | 네트워크 볼륨 (클라우드 종속적) |
|---|---|---|---|
| emptyDir | hostpath local |
iSCSI NFS cephFS glusterFS ... |
gcePersistentDisk awsEBS azureFile ... |
- 임시 볼륨: 포드가 사라지면 함께 파괴되는 임시 볼륨 포드 내부에서만 컨테이너와 공유하기 위해서 사용
- 로컬 볼륨: 공유 폴더 같은 개념, 로컬에서만 사용가능하므로 다른 포드생성시 사용 불가 노드와 공유하기 위해 사용
- 네트워크 볼륨: 클러스터 외부에 있는 자원과 데이터를 공유하기 위해 사용
- 네트워크 볼륨(클라우드 종속적): 클라우드에서 사용 가능
주요 사용 가능한 볼륨의 유형
emptyDir: 일시적인 데이터 저장, 비어 있는 디렉터리
hostPath: 포드에 호스트 노드의 파일 시스템에서 파일이나 디렉토리를 마운트
nfs: 기존 NFS (네트워크 파일 시스템) 공유가 포드에 장착
gcePersistentDisk: 구글 컴퓨트 엔진 (GCE) 영구디스크 마운트 (awsElasticBlockStore, azureDisk 또한 클라우드에서 사용하는 형태)
persistentVolumeClaim: 사용자가 특정 클라우드 환경의 세부 사항을 모른 채 GCE PersistentDisk 또는 iSCSI 볼륨과 같은 내구성 스토리지를 요구(Claim)할 수 있는 방법
configMap, Secret, downwardAPI: 특수한 유형의 볼륨(나중에 배움)
볼륨 관련 레퍼런스
emptyDir을 활용한 파일 시스템 공유
하나의 포드 안에서 두개이상의 컨테이너가 데이터를 공유하고자 할때 사용
WebServer: 웹서비스 요청에 따라 응답해주는 서버, 컨텐츠를 전달해주는 역할
ContentAgent: 서비스가 원활하게 목적에 맞는 데이터를 제공할 수 있게 컨텐츠를 만들어주는 역할을 함
LogRotator: 로그를 계속 전환하면서 백업하는 시스템
공유 스토리지가 없는 동일한 포드의 세 개의 컨테이너

- 두 개의 볼륨을 공유하는 세 개의 컨테이너

emptyDir 볼륨 사용하기
- 볼륨을 공유하는 애플리케이션 생성
docker build -t gasbugs/count .docker push gasbugs/count
dockerfile
FROM busybox:latest
ADD count.sh /bin/count.sh
ENTRYPOINT /bin/count.sh
count.sh
#!/bin/bash
trap "exit" SIGINT
mkdir /var/htdocs

SET=$(seq 0 99999)

for i in $SET

do
    echo "Running loop seq "$i > /var/htdocs/index.html
    sleep 10
done
$ kubectl create -f count-pod.yaml
pod/count created
$ kubectl port-forward count 8080:80 &
Forwarding from 127.0.0.1:8080 -> 80
$ curl 127.0.0.1:8080
Handling connection for 8080
Running loop seq 3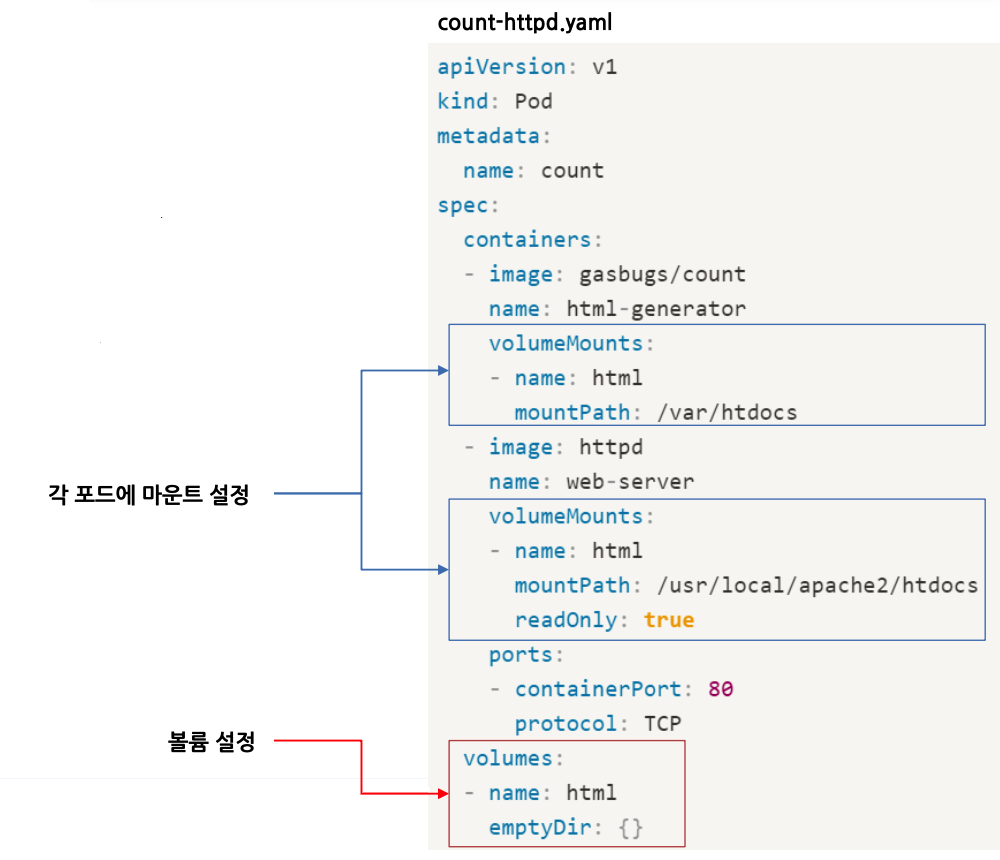
실습
GKE 에서 작업
example 참조
https://kubernetes.io/docs/concepts/storage/volumes/#emptydir-configuration-example
count-httpd.yaml 파일 생성
apiVersion: v1
kind: Pod
metadata:
  name: count
spec:
  containers:
  - image: gasbugs/count
    name: html-generator
    volumeMounts:
    - mountPath: /var/htdocs
      name: html
  - image: httpd
    name: web-server
    volumeMounts:
    - name: html
      mountPath: /usr/local/apache2/htdocs
      readOnly: true
    ports:
    - containerPort: 80
  volumes:
  - name: html
    emptyDir: {}
생성
$ kubectl create -f count-httpd.yaml
pod/count created
생성 확인
$ kubectl get pod -w
NAME    READY   STATUS    RESTARTS   AGE
count   2/2     Running   0          39s
IP 주소 확인
$ kubectl get pod -o wide
NAME    READY   STATUS    RESTARTS   AGE   IP          NODE                                       NOMINATED NODE   READINESS GATES
count   2/2     Running   0          75s   10.32.2.4   gke-cluster-1-default-pool-f6cef6fa-hbbq   <none>           <none>
http-go 로 동작확인
$ kubectl exec -it http-go-6d46d6c74d-kg4br -- curl 10.32.2.4
Running loop seq 29
연습문제
- 같은 emptyDir을 공유하는 프로세스를 만들어 통신하기
- 하나의 프로세스는 랜덤한 값을 생성 (count 이미지 사용)
- 하나의 프로세스는 랜덤한 값을 출력 (httpd 이미지 사용)
위에 실습한 내용 스스로 해보기
hostPath 볼륨
- 노드의 파일 시스템에 있는 특정 파일 또는 디렉터리 지정
- 영구 스토리지
- 다른 노드의 포드끼리 데이터 공유는 안됨
노드에 있는 데이터를 컨테이너와 공유할때 주로 사용이됨
모니터링 데이터를 수집할때 가장 좋은 방법은 hostPath를 사용하는 것

- hostPath 사용 현황 파악하기
VirtualBox 에는 없음 GKE에서 확인
Volumes에서 데이터를 수집하기위해 각각의 볼륨 마운팅을 해놓은 것을 확인할 수 있음
$ kubectl get pods --namespace kube-system
NAME                                                        READY   STATUS    RESTARTS   AGE
event-exporter-gke-77cccd97c6-hpcd6                         2/2     Running   0          62m
fluentd-gke-2z487                                           2/2     Running   0          61m
fluentd-gke-qsqtr                                           2/2     Running   0          60m
fluentd-gke-rw29v                                           2/2     Running   0          60m
[...]

$ kubectl describe pod fluentd-gcp-v3.2.0-fgc7k --namespace kube-system
Name:                 fluentd-gke-2z487
Namespace:            kube-system
[...]
Volumes:
  varrun:
    Type:          HostPath (bare host directory volume)
    Path:          /var/run/google-fluentd
    HostPathType:
  varlog:
    Type:          HostPath (bare host directory volume)
    Path:          /var/log
    HostPathType:
[...]
실습
VirtualBox work1, work2 에서 진행
work1에 /var/htdocs 디렉토리 만들고 index.html 생성
$ sudo mkdir /var/htdocs
$ sudo su
$ echo "work1" > /var/htdocs/index.html
work2에 /var/htdocs 디렉토리 만들고 index.html 생성
$ sudo mkdir /var/htdocs
$ sudo su
$ echo "work2" > /var/htdocs/index.html
hostPath example 참조
https://kubernetes.io/docs/concepts/storage/volumes/#hostpath-configuration-example
hostpath-http.yaml 파일 생성
apiVersion: v1
kind: Pod
metadata:
  name: hostpath-http
spec:
  containers:
  - image: httpd
    name: web-server
    volumeMounts:
    - name: html
      mountPath: /usr/local/apache2/htdocs
      readOnly: true
    ports:
    - containerPort: 80
      protocol: TCP
  volumes:
  - name: html
    hostPath:
      path: /var/htdocs
      type: Directory
kubectl로 생성
$ kubectl create -f hostpath-httpd.yaml
pod/hostpath-http created

$ kubectl get pod -w
NAME                      READY   STATUS    RESTARTS   AGE
hostpath-http             1/1     Running   0          42s
http-go-568f649bb-9qmct   1/1     Running   1          3h36m
요청 응답 확인
$ kubectl port-forward hostpath-http 8888:80
Forwarding from 127.0.0.1:8888 -> 80
Forwarding from [::1]:8888 -> 80
hostPath가 work2에 떠있는 것을 확인
$ curl localhost:8888
work2

$ kubectl get pod -o wide
NAME                      READY   STATUS    RESTARTS   AGE     IP          NODE    NOMINATED NODE   READINESS GATES
hostpath-http             1/1     Running   0          3m21s   10.46.0.3   work2   <none>           <none>
http-go-568f649bb-9qmct   1/1     Running   1          3h38m   10.46.0.2   work2   <none>           <none>
GKE에서 실습
kube-system 은 시스템을 관리하기 위한 포드들이 모여있음
fluentd - 노드에서 로깅되는 데이터들을 수집
$ kubectl get pod -n kube-system
NAME                                                        READY   STATUS    RESTARTS   AGE
event-exporter-gke-77cccd97c6-hpcd6                         2/2     Running   0          147m
fluentd-gke-2z487                                           2/2     Running   0          146m
fluentd-gke-qsqtr                                           2/2     Running   0          145m
fluentd-gke-rw29v                                           2/2     Running   0          145m
fluentd-gke-scaler-54796dcbf7-82xg4                         1/1     Running   0          147m
...
fluentd hostPath 사용여부 확인
hostPath 는 로컬의 정보 가져오는 것임
$ kubectl get pod fluentd-gke-2z487 -n kube-system -o yaml
...
volumeMounts:
- mountPath: /var/run/google-fluentd
name: varrun
- mountPath: /var/log
name: varlog
- mountPath: /var/lib/docker/containers
name: varlibdockercontainers
readOnly: true
...
volumes:
- hostPath:
path: /var/run/google-fluentd
type: ""
name: varrun
- hostPath:
path: /var/log
type: ""
name: varlog
- hostPath:
path: /var/lib/docker/containers
type: ""
name: varlibdockercontainers
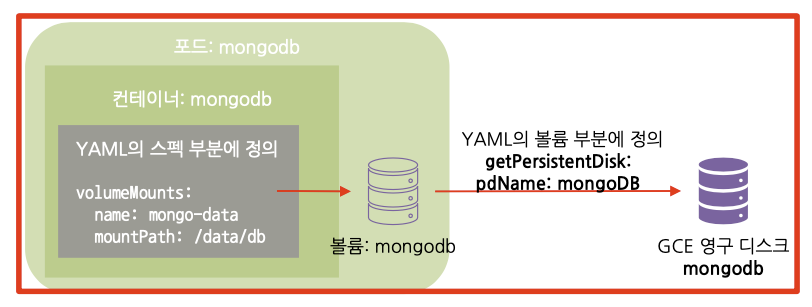
...GCE 영구 스토리지 사용하기
- 데이터가 지속
- 모든 포드에서 공유
- mongo 컨테이너에 마운트하여 사용
mongoDB Volume 하나로만 포드 하나에서만 데이터를 가질 수 있는 방법을 살펴봄

- GCE 영구 디스크를 동일한 리전에 생성
HDD: pd-standard
SSD: pd-ssd
생성 후 GCP Compute Engine - 디스크에서 확인 가능
$ gcloud compute disks create --size=10GiB --zone=asia-northeast3-a mongodb
WARNING: You have selected a disk size of under [200GB]. This may result in poor I/O performance. For more information, see: https://developers.google.com/compute/docs/disks#performance.
Created [https://www.googleapis.com/compute/v1/projects/freework-gke-test-20201227/zones/asia-northeast3-a/disks/mongodb].
NAME     ZONE               SIZE_GB  TYPE         STATUS
mongodb  asia-northeast3-a  10       pd-standard  READY
New disks are unformatted. You must format and mount a disk before it
can be used. You can find instructions on how to do this at:
https://cloud.google.com/compute/docs/disks/add-persistent-disk#formatting
https://kubernetes.io/docs/concepts/storage/volumes/#gcepersistentdisk
- 포드 YAML의 gcePersistentDisk 정의하기
- 볼륨만을 별도로 선언할 수 없기 때문에 포드를 생성하여 volume 구성
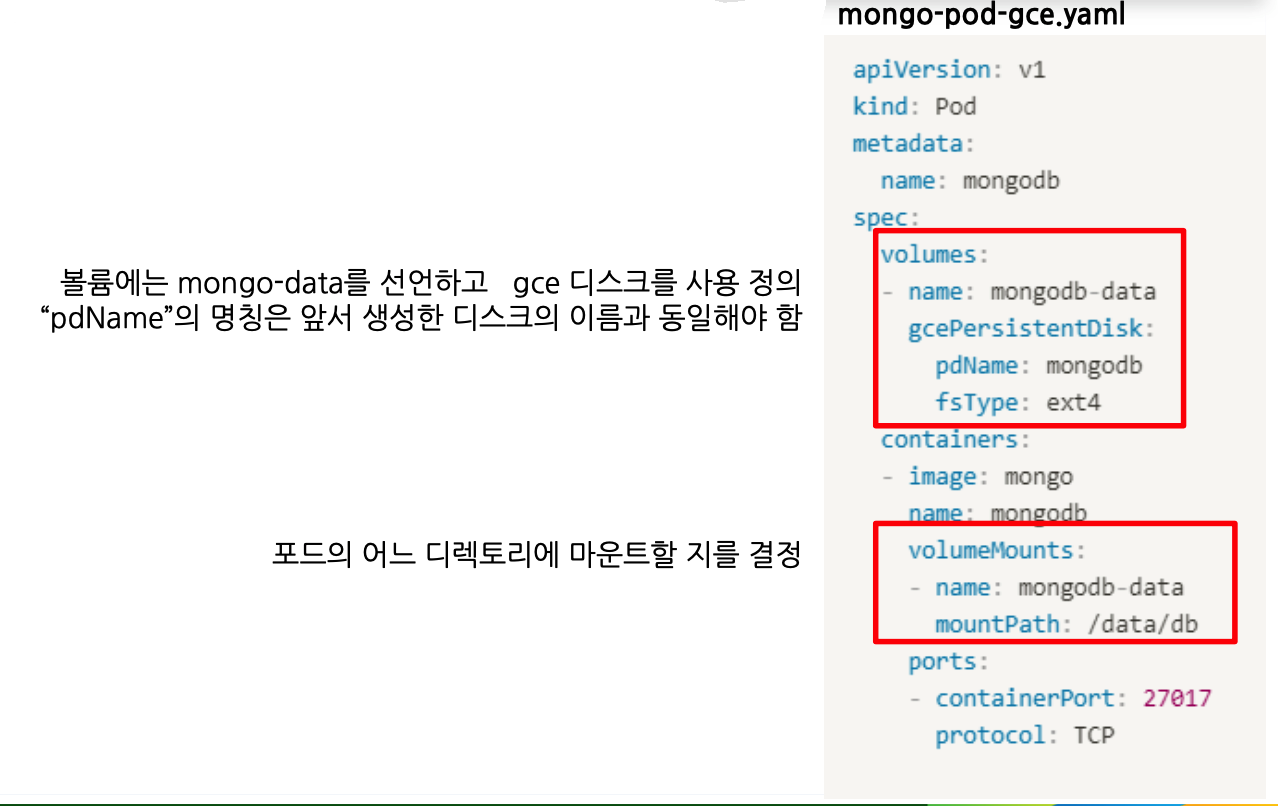
pdName이 생성한 Disk 명과 동일해야 함
gcePersistentDisk yaml Example 참조
https://kubernetes.io/docs/concepts/storage/volumes/#gce-persistent-disk-configuration-example
gce-mongodb-pod.yaml 파일 생성
apiVersion: v1
kind: Pod
metadata:
  name: mongodb
spec:
  containers:
  - image: mongo
    name: mongodb
    volumeMounts:
    - mountPath: /data/db
      name: mongodb
  volumes:
  - name: mongodb
    gcePersistentDisk:
      pdName: mongodb
      fsType: ext4
kubectl 로 생성
$ kubectl create -f gce-mongodb-pod.yaml
pod/mongodb created

$ kubectl get pod -w
NAME      READY   STATUS    RESTARTS   AGE
mongodb   1/1     Running   0          79s
문제 발생시 pod 확인
$ kubectl describe pod mongodb
...
Events:
  Type    Reason                  Age   From                     Message
  ----    ------                  ----  ----                     -------
  Normal  Scheduled               70s   default-scheduler        Successfully assigned default/mongodb to gke-cluster-1-default-pool-f6cef6fa-hbbq
  Normal  SuccessfulAttachVolume  64s   attachdetach-controller  AttachVolume.Attach succeeded for volume "mongodb"
  Normal  Pulling                 21s   kubelet                  Pulling image "mongo"
  Normal  Pulled                  8s    kubelet                  Successfully pulled image "mongo"
  Normal  Created                 6s    kubelet                  Created container mongodb
Normal Started 6s kubelet Started container mongodb- mongoDB 데이터 입출력 테스트 (입력)
- YAML파일로 pod를 생성하고 DB가 잘 동작하는 지 확인
$ kubectl exec -it mongodb mongo
MongoDB shell version v4.0.10
connecting to: mongodb://127.0.0.1:27017/?gssapiServiceName=mongodb [...]

> use mystore
switched to db mystore

> db.foo.insert({name:'test',value:'1234'})
WriteResult({ "nInserted" : 1 })

> db.foo.find()
{ "_id" : ObjectId("5d0f0b03a3edc611a05bda93"), "name" : "foo", "value" : "1234" }- pod 삭제후 재 생성 후 데이터가 그대로 있는지 확인
$ kubectl delete pod mongodb
pod "mongodb" deleted

$ kubectl create -f gce-mongodb-pod.yaml
pod/mongodb created

$ kubectl exec -it mongodb mongo
MongoDB shell version v4.0.10
connecting to: mongodb://127.0.0.1:27017/?gssapiServiceName=mongodb [...]

> use mystore
switched to db mystore

> db.foo.find()
{ "_id" : ObjectId("5d0f0b03a3edc611a05bda93"), "name" : "foo", "value" : "1234" }
NFS 네트워크 볼륨 사용하기
work2 에서 진행
NFS 네트워크 볼륨이 있어야 K8S와 테스트 가능
- 서버 설치 방법
apt-get updateapt-get install nfs-common nfs-kernel-server portmap -y
- 공유할 디렉토리 생성
mkdir /home/nfschmod 777 /home/nfs
- /etc/exports 파일에 다음 내용 추가
- /home/nfs 10.0.2.15(rw,sync,no_subtree_check) 10.0.2.6(rw,sync,no_subtree_check) 10.0.2.7(rw,sync,no_subtree_check)
service nfs-server restart- 마운트 가능한 서버 확인
showmount -e 127.0.0.1
- NFS 클라이언트에서는 mount 명령어로 마운트해서 사용
mount -t nfs 10.0.2.7:/home/nfs /mnt- 파일 작성후 확인
echo 'test' > /home/nfs/test.txtcat /mnt/test.txt
- 서버 설치 방법
각 노드에 NFS 관련 라이브러리 설치
apt-get updateapt-get install nfs-common nfs-kernel-server portmap -y
/home/nfs에 index.html을 생성
nfs-httpd.yaml 파일을 실행 후 접속 테스트
nfs 내용 참조
https://kubernetes.io/docs/concepts/storage/volumes/#nfs
nfs Example 참조
https://github.com/kubernetes/examples/blob/master/staging/volumes/nfs/nfs-pv.yaml
emptyDir Example 와 조합
https://kubernetes.io/docs/concepts/storage/volumes/#emptydir-configuration-example
master에 nfs-httpd.yaml 파일 생성
apiVersion: v1
kind: Pod
metadata:
  name: nfs-httpd
spec:
  containers:
  - image: httpd
    name: web
    volumeMounts:
    - mountPath: /usr/local/apache2/htdocs
      name: nfs-volume
      readOnly: true
  volumes:
  - name: nfs-volume
    nfs:
      server: 10.0.2.7
      path: /home/nfs
work2 에 index.html 생성
$ cd /home/nfs
$ echo nfs > index.html
master 에서 kubectl 로 생성
node에 있는 nfs 기능을 이용해서 mount를 시키는 거라서 네트워크 파일 시스템 기능이 필요함
$ kubectl create -f nfs-httpd.yaml
pod/nfs-httpd created
port-forward 후 접속 확인
$ kubectl port-forward nfs-httpd 8888:80
Forwarding from 127.0.0.1:8888 -> 80
Forwarding from [::1]:8888 -> 80
$ curl localhost:8888
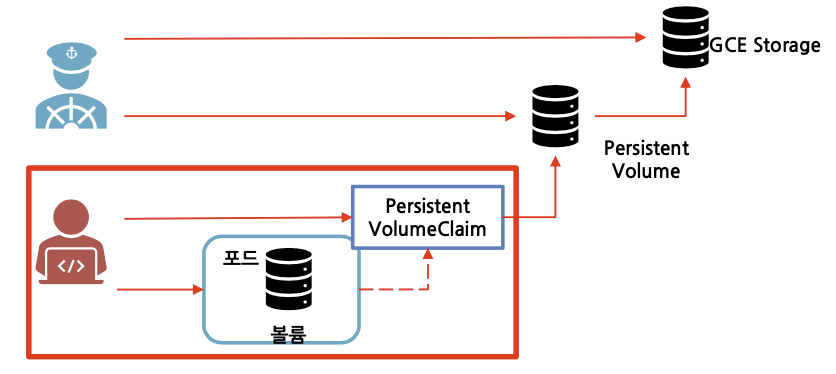
nfs포드 개발자 입장에서의 추상화
- 포드 개발자가 클러스터에서 스토리지를 사용할 때 인프라를 알아야 할까?
- 실제 네트워크 스토리지를 사용하려면 알아야 함
- 애플리케이션을 배포하는 개발자가 스토리지 기술의 종류를 몰라도 상관없도록 하는 것이 이상적
- 인프라 관련 처리는 클러스터 관리자의 유일한 도메인!
- pv와 pvc를 사용해 관리자와 사용자의 영역을 나눔

PersistentVolume(PV)과 PersistentVolumeClaim(PVC)
- 인프라 세부 사항을 알지 못해도 클러스터의 스토리지를 사용할 수 있도록 제공해주는 리소스
- 포드 안에 영구 볼륨을 사용하도록 하는 방법은 다소 복잡

PV, PVC의 장점 비교
getPersistentDisk를 사용할 때 사용자가 알아야 하는 부분
pv, pvc를 사용할 때 사용자가 알아야 하는 부분
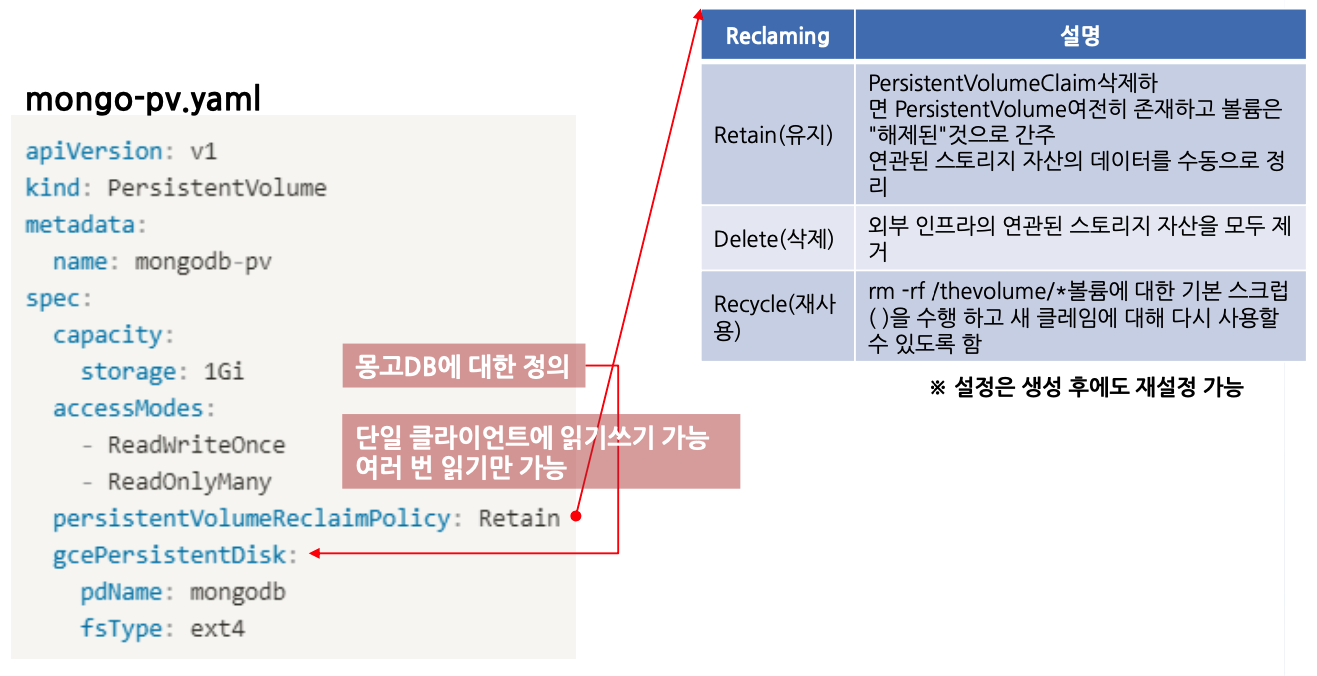
PersistentVolume(PV)과 PersistentVolumeClaim(PVC) 정의
- 두 가지 새로운 요소에 대해 정의: PVC

- 참고: PV는 네임스페이스에 속하지 않는다!
- 인프라 세부 사항을 알지 못해도 클러스터의 스토리지를 사용할 수 있도록 제공해주는 리소스
- 포드 안에 영구 볼륨을 사용하도록 하는 방법은 다소 복잡

PV, PVC 생성과 조회
기존 yaml 파일을 mongo-pv-pvc-pod.yaml 파일로 복사해서 생성
$ cp gce-mongodb-pod.yaml mongo-pv-pvc-pod.yaml
$ vi mongo-pv-pvc-pod.yaml
지난 시간에 했던 내역 삭제
$ kubectl delete -f mongo-pv-pvc-pod.yaml
pod "mongodb" deleted
Persistent Volumes 설정 내용 참조
https://kubernetes.io/docs/concepts/storage/volumes/#persistentvolumeclaim
https://kubernetes.io/docs/concepts/storage/persistent-volumes/#persistent-volumes
https://kubernetes.io/docs/concepts/storage/persistent-volumes/#persistentvolumeclaims
https://kubernetes.io/docs/concepts/storage/persistent-volumes/#claims-as-volumes
mongo-pv-pvc-pod.yaml 파일 작성
apiVersion: v1
kind: Pod
metadata:
  name: mongodb
spec:
  containers:
  - image: mongo
    name: mongodb
    volumeMounts:
    - mountPath: /data/db
      name: mongodb
  volumes:
  - name: mongodb
    persistentVolumeClaim:
      claimName: mongo-pvc
---
apiVersion: v1
kind: PersistentVolumeClaim
metadata:
  name: mongo-pvc
spec:
  accessModes:
    - ReadWriteOnce
  resources:
    requests:
      storage: 10Gi
  storageClassName: ""
---
apiVersion: v1
kind: PersistentVolume
metadata:
  name: mongo-pv
spec:
  capacity:
    storage: 10Gi
  volumeMode: Filesystem
  accessModes:
    # 하나의 읽기 쓰기
    - ReadWriteOnce
    # 많이 읽기
    - ReadOnlyMany
  # Retain 유지 하겠다
  persistentVolumeReclaimPolicy: Retain
  gcePersistentDisk:
    pdName: mongodb
    fsType: ext4
kubectl 로 생성 및 확인
pv는 namespace 가 있고 pvc는 없음
$ kubectl create -f mongo-pv-pvc-pod.yaml
pod/mongodb created
persistentvolumeclaim/mongo-pvc created
persistentvolume/mongo-pv created

$ kubectl get pvc
NAME        STATUS   VOLUME     CAPACITY   ACCESS MODES   STORAGECLASS   AGE
mongo-pvc   Bound    mongo-pv   10Gi       RWO,ROX                       118s

$ kubectl get pv
NAME       CAPACITY   ACCESS MODES   RECLAIM POLICY   STATUS   CLAIM               STORAGECLASS   REASON   AGE
mongo-pv   10Gi       RWO,ROX        Retain           Bound    default/mongo-pvc                           64s

$ kubectl get pod
NAME      READY   STATUS    RESTARTS   AGE
mongodb   1/1     Running   0          4m45s
PVC를 활용한 포드 생성
지난 번과 동일하게 mongodb 에 접속하여 데이터를 확인해보면 데이터가 그대로 있는 것을 확인할 수 있음
$ kubectl exec -it mongodb mongo
MongoDB shell version v4.0.10
connecting to: mongodb://127.0.0.1:27017/?gssapiServiceName=mongodb [...]

> use mystore
switched to db mystore

> db.foo.find()
{ "_id" : ObjectId("5d0f0b03a3edc611a05bda93"), "name" : "foo", "value" : "1234" }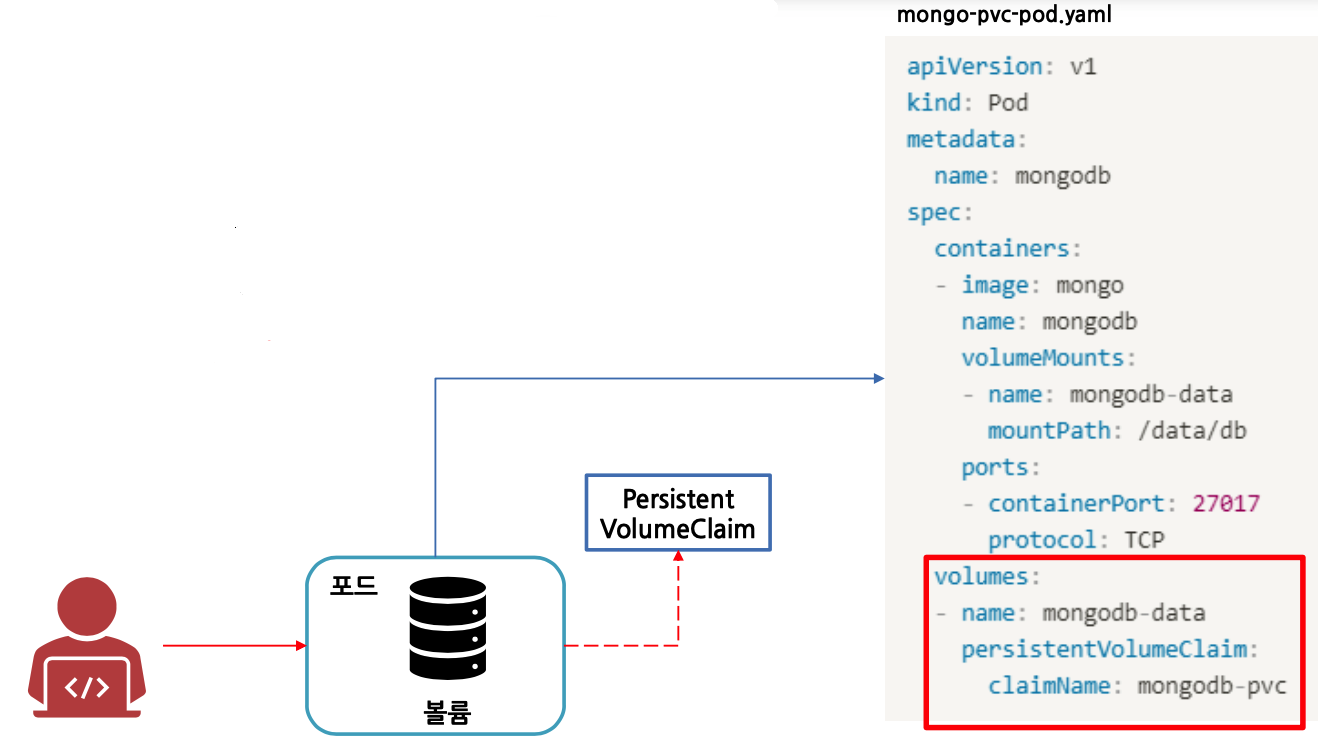
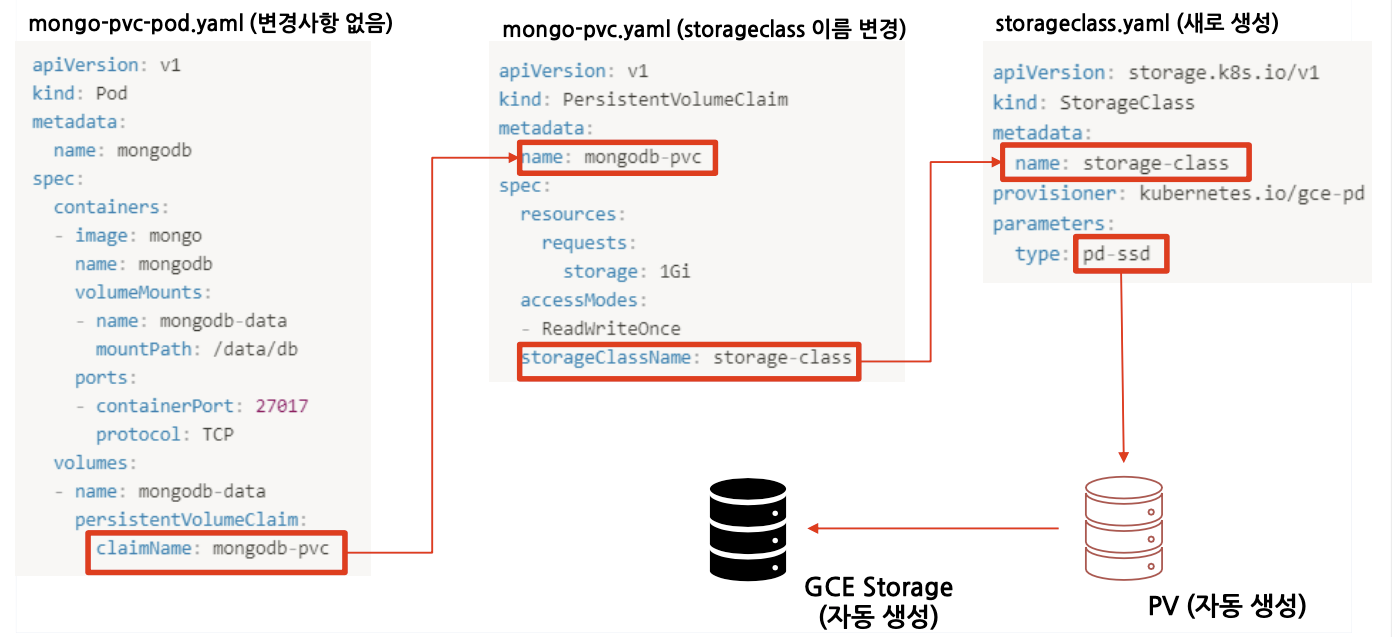
PV 동적 프로비저닝
- PV를 직접 만드는 대신 사용자가 원하는 PV 유형을 선택하도록 오브젝트 정의 가능
- 가상으로 디스크를 만드는 환경이 필요함

- StorageClass yaml 파일 제작

지난 시간에 했던 것 삭제
$ kubectl delete all --all
pod "mongodb" deleted
service "kubernetes" deleted

$ kubectl delete pvc --all
persistentvolumeclaim "mongo-pvc" deleted

$ kubectl delete pv --all
persistentvolume "mongo-pv" deleted
Storage Classes 내용 참조
https://kubernetes.io/docs/concepts/storage/storage-classes/#gce-pd
mongo-storage.yaml 파일 작성
apiVersion: storage.k8s.io/v1
kind: StorageClass
metadata:
  name: storage
provisioner: kubernetes.io/gce-pd
parameters:
  type: pd-ssd
---
apiVersion: v1
kind: PersistentVolumeClaim
metadata:
  name: mongo-pvc
spec:
  accessModes:
    - ReadWriteOnce
  resources:
    requests:
      storage: 10Gi
  storageClassName: storage
---
apiVersion: v1
kind: Pod
metadata:
  name: mongodb
spec:
  containers:
  - image: mongo
    name: mongodb
    volumeMounts:
    - mountPath: /data/db
      name: mongodb
  volumes:
  - name: mongodb
    persistentVolumeClaim:
      claimName: mongo-pvc
kubectl 로 생성 및 확인
$ kubectl create -f mongo-storage.yaml
storageclass.storage.k8s.io/storage created
persistentvolumeclaim/mongo-pvc created
pod/mongodb created

$ kubectl get sc
NAME                 PROVISIONER            AGE
standard (default)   kubernetes.io/gce-pd   15h
storage              kubernetes.io/gce-pd   45s
pvc에 별도로 pv에 대한 내용을 명시하지 않았는데 동적으로 생성되서 Bound 된 것을 확인
$ kubectl get pvc
NAME        STATUS   VOLUME                                     CAPACITY   ACCESS MODES   STORAGECLASS   AGE
mongo-pvc   Bound    pvc-8ca9519e-5041-4540-9cac-cefc0ec669e2   10Gi       RWO            storage        79s
동적으로 생성된 pv 의 정책을 변경할 수 있음
$ kubectl edit pv pvc-8ca9519e-5041-4540-9cac-cefc0ec669e2Volume 옵션 Retain 으로 내용 수정
...
nodeAffinity:
  ...
  persistentVolumeReclaimPolicy: Retain
  ...
Compute Engine - 디스크에 SSD 디스크가 새롭게 생성된 것을 확인할 수 있음
Volume 옵션 Delete 로 내용 수정 시 pvc 가 사라지면 pv storage 도 함께 삭제됨
...
nodeAffinity:
  ...
  persistentVolumeReclaimPolicy: Delete
  ...
pod 삭제
$ kubectl delete pod --all
pod "mongodb" deleted
pvc 확인 및 삭제
동적으로 생성된 pv 이므로 pvc 만 삭제되도 함께 삭제됨
$ kubectl get pvc
NAME        STATUS   VOLUME                                     CAPACITY   ACCESS MODES   STORAGECLASS   AGE
mongo-pvc   Bound    pvc-8ca9519e-5041-4540-9cac-cefc0ec669e2   10Gi       RWO            storage        14m

$ kubectl delete pvc --all
persistentvolumeclaim "mongo-pvc" deleted

$ kubectl get pv
No resources found
PVC 파일 제작
- 포드와 PVC 모두 삭제 후 재 업로드 (apply 명령어 시 권한 에러 발생)
- mongo-pvc.yaml 내용 변경

PV 동적 프로비저닝
- PV 동적 프로비저닝을 사용하면 사용할 디스크와 PV가 자동으로 생성됨
$ gcloud compute disks list
$ gcloud compute disks list
NAME                                                             LOCATION           LOCATION_SCOPE  SIZE_GB  TYPE         STATUS
gke-cluster-1-b19e0744-pvc-7894b8c7-f9d6-4bdd-a9fe-c8354db51159  asia-northeast3-a  zone            10       pd-ssd       READY
...

$ kubectl get pv
NAME                                       CAPACITY   ACCESS MODES   RECLAIM POLICY   STATUS   CLAIM               STORAGECLASS   REASON   AGE
pvc-7894b8c7-f9d6-4bdd-a9fe-c8354db51159   10Gi       RWO            Delete           Bound    default/mongo-pvc   storage                 58s
PV 동적 프로비저닝 동작 순서 정리
연습문제
- mongo를 사용할 수 있도록 pod, pvc, pv 정의하여 수동 프로비저닝 수행하기
- Mongo를 사용할 수 있도록 수동으로 pod, pvc, pv, disk를 정의하고 생성하라
- Mongo를 사용할 수 있도록 pod, pvc, storageclass 정의하여 동적 프로비저닝 수행하기
- Mongo를 사용할 수 있도록 수동으로 pod, pvc, storageclass를 정의하고 생성하라
'개발강의정리 > DevOps' 카테고리의 다른 글
| [아파치 카프카 입문과 활용] 1. Apache kafka 기본개념 및 생태계 (0) | 2021.01.04 |
|---|---|
| [데브옵스를 위한 쿠버네티스 마스터] 쿠버네티스 핵심개념-Statefulset (0) | 2021.01.03 |
| [데브옵스를 위한 쿠버네티스 마스터] 쿠버네티스 핵심개념-Network (0) | 2021.01.03 |
| [데브옵스를 위한 쿠버네티스 마스터] 쿠버네티스 핵심 개념-Services (0) | 2020.12.27 |
| [데브옵스를 위한 쿠버네티스 마스터] 쿠버네티스 핵심 개념-Namespaces (0) | 2020.12.27 |

댓글