728x90
5. Client LoadBalancer - Ribbon

Server Side LoadBalancer
- 일반적인 L4 Switch 기반의 Load Balancing
- Client 는 L4 의 주소만 알고 있음
- L4 Switch 는 Server 의 목록을 알고 있음(Server Side Load Balancing)
- H/W Server Side Load Balancer 단점 (장점도 있지만..)
- H/W 가 필요 (비용 up, 유연성 down)
- 서버 목록의 추가를 위해서는 설정 필요 (자동화 어려움)
- Load Balancing Schema 이 한정적 (Round Robbin, Sticky)
- 12 factors 의 dev/prod 를 만족하기 어려움

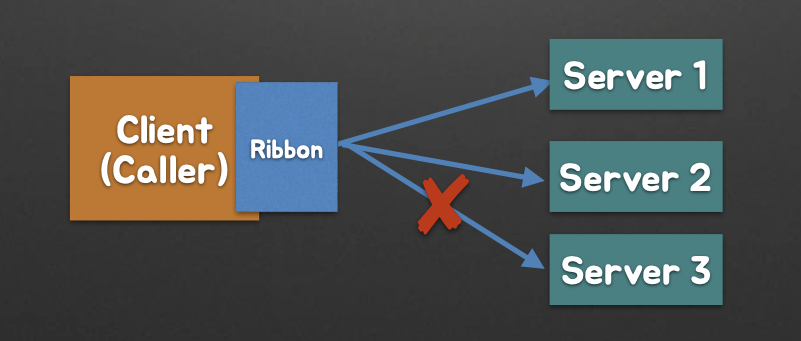
Client LoadBalancer - Ribbon
- Client (API Caller) 에 탑재되는 S/W 모듈
- 주어진 서버 목록에 대해서 Load Balancing 을 수행함
- Ribbobn 의 장점 (단점도 있지만... )
- H/W 가 필요 없이 S/W 로만 가능 (비용 down, 유연성 up)
- 서버 목록의 동적 변경이 자유로움 (단 Coding 필요)
- Load Balancing Schema 이 마음대로 구성 가능 (단 Coding 필요)

[실습 Step-3] RestTemplate에 Ribbon 적용하기
Tag : step-3-baseline
1. [product] ProductController 정상 코드로 복원
- 준비작업 (Application 정상화)
- Sleep 제거 / Throw Exception 제거
@GetMapping(path = "{productId}")
public String getProductInfo(@PathVariable String productId) {

//        try {
//            Thread.sleep(2000);
//        } catch (InterruptedException e) {
//            e.printStackTrace();
//        }

    return "[product id = " + productId + " at " + System.currentTimeMillis() + "]";
//    throw new RuntimeException("I/O Exception");
}
2. [display] build.gradle에 dependency 추가
compile('org.springframework.cloud:spring-cloud-starter-netflix-ribbon')
잠시 대기 후 외부 라이브러리에 아래 확인

3. [display] DisplayApplication의 RestTemplate 빈에 @LoadBalanced 추가
@SpringBootApplication
@EnableCircuitBreaker
public class DisplayApplication {

    @Bean
    @LoadBalanced
    public RestTemplate restTemplate() {
        return new RestTemplate();
    }

    public static void main(String[] args) {
        SpringApplication.run(DisplayApplication.class);
    }

}
Tag : step-3-ribbon-loadbalanced
4. [display] ProductRemoteServiceImpl에서 주소 제거하고 product 로 변경
//private final String url = "http://localhost:8082/products/";
private final String url = "http://product/products/";
5. [display] application.yml에 ribbon 설정 넣기
product:
  ribbon:
listOfServers: localhost:8082- listOfServers에 서버 목록 추가
6. 확인
- http://localhost:8081/displays/11111
- 동작 !!
- RestTemplate에 주소가 아닌 단지 이름
product을 넣었는데 동작
7. 정리
- Ribbon 디펜던시 추가 후 RestTemplate에
@LoadBalanced - 설정에 특정 서비스(product)의 주소 설정
- RestTemplate 사용 시 주소 넣지 않고 서비스 이름(product) 사용
- 로드 발란스는 ???
[실습 Step-3] Ribbon의 Retry 기능
Tag : step-3-ribbon-retry
1. [display] applicaiton.yml에 서버 주소 추가 및 Retry 관련 속성 조정
product:
  ribbon:
    listOfServers: localhost:8082,localhost:7777
    MaxAutoRetries: 0
    MaxAutoRetriesNextServer: 1
2. [display] build.gradle 에 retry dependency 추가
compile('org.springframework.retry:spring-retry:1.2.2.RELEASE')
3. 확인
- http://localhost:8081/displays/11111
- localhost:7777은 없는 주소 이므로 Exception 발생
- 그러나 Ribbon Retry로 항상 성공
- Round Robin Client Load Balancing & Retry
4. 주의
- Retry를 시도하다가도 HystrixTimeout이 발생하면, 즉시 에러 반환 리턴할 것이다
(Hystrix로 Ribbon을 감싸서 호출한 상태이기 때문에) - Retry를 끄거나, 재시도 횟수를 0으로 하여도 해당 서버로의 호출이 항상 동일한 비율로 실패하지는 않는다
(실패한 서버로의 호출은 특정 시간동안 Skip 되고 그 간격은 조정된다 - BackOff) - classpath 에 retry 가 존재해야 한다는 점 주의
5. 정리
- Ribbon은 여러 Component에 내장되어있으며, 이를 통해 Client Load Balancing이 수행 가능하다
- Ribbon에는 매우 다양한 설정이 가능하다 (서버선택, 실패시 Skip 시간, Ping 체크)
- Ribbon에는 Retry기능이 내장 되어있다
- Eureka와 함께 사용될 때 강력하다 (뒤에 실습)
728x90
'SpringCloud' 카테고리의 다른 글
| [Spring Cloud 를 활용한 MSA 기초] 7. Declarative Http Client - Feign (0) | 2021.02.07 |
|---|---|
| [Spring Cloud 를 활용한 MSA 기초] 6. Service Registry - Eureka (0) | 2021.02.07 |
| [Spring Cloud 를 활용한 MSA 기초] 4. Circuit Breaker - Hystrix (0) | 2021.02.07 |
| [Spring Cloud 를 활용한 MSA 기초] 3. Cloud Native 이해 (0) | 2021.02.07 |
| [Spring Cloud 를 활용한 MSA 기초] 2. 마이크로서비스 아키텍처(MSA) 이해 (0) | 2021.02.07 |


댓글