6. Service Registry - Eureka
Ribbon 예제에서 서버 목록을 yml에 직접 넣었는데 자동화 할 방법은 ?
'서버가 새롭게 시작되면 그것을 감지하여 목록에 자동으로 추가되고,
서버가 종료되면 자동으로 목록에서 삭제하기 위한 방법은 없을까 ?'
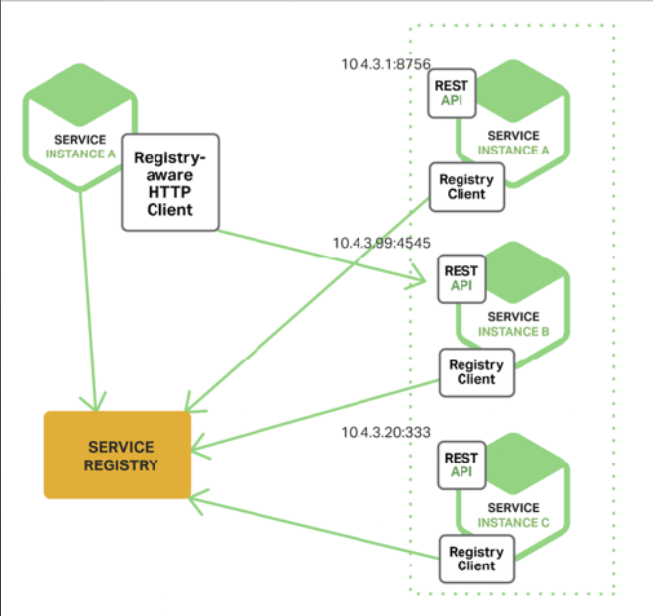
Dynamic Service Discovery - Eureka
- Service Registry
- 서비스 탐색, 등록
- 클라우드의 전화번호부
- (단점) 침투적 방식 코드 변경
- DiscoveryClient
- spring-cloud 에서 서비스 레지스트리 사용 부분을 추상화(Interface)
- Eureka, Consul, Zookeeper, etcd 등의 구현체가 존재

Ribbon은 Eureka과 결합하여 사용 할 수 있으며 서버 목록을 자동으로 관리
Eureka Server(Registry) 만들기
@EnableEurekaServer
@SpringBootApplication
public class EurekaServerApplication {

    public static void main(String[] args) {
        SpringApplication.run(EurekaServerApplication.class, args);
    }
}
Spring Boot Application 작성 후 @EnableEurekaServer 만 주석을 달면 끝
Eureka Client 만들기 - 내 서버 정보 등록 하기 - 내가 호출의 대상이 되고 싶을 때
@EnableEurekaClient
@SpringBootApplication
public class EurekaServiceApplication {

    public static void main(String[] args) {
        SpringApplication.run(EurekaServiceApplication.class);
    }

}
application.yaml
eureka:
  client:
    service-url:
      defaultZone: http://localhost:8761/eureka  # default address
Spring Boot Application 작성 후 @EnableEurekaServer 만 주석을 달면 끝
Eureka Client 만들기 - 다른 서버의 목록을 가져오고 싶을 때 - Eureka 에 등록된 서버 주소 목록을 알고 싶을 때
@Service
class ServiceInstanceRestController {

    private final DiscoveryClient discoveryClient;

    public ServiceInstanceRestController(DiscoveryClient discoveryClient) {
        this.discoveryClient = discoveryClient;
    }

    public void doSomething() {
        List<ServiceInstance> = this.discoveryClient.getInstances(applicationName);
    }
}
application.yml
spring:
  cloud:
    service-registry:
      auto-registration:
enabled: false # 현재 인스턴스를 Reigstry 에 등록하지 않고 싶을 때 false- 특별한 시나리오 없이 DiscoveryClient 직접 호출 필요 없음
- (Ribbon 이 DiscoveryClient 를 이용해서 서버 목록을 가져옴)
Eureka in Spring Cloud
- 서버 시작 시 Eureka Server(Registry) 에 자동으로 자신의 상태를 등록(UP)
eureka.client.register-with-eureka: true(default)
- 주기적 HeartBeat 으로 Eureka Server에 자신이 살아 있음을 알림
eureka.instance.lease-renewal-interval-in-seconds: 30(default)- 서버 종료 시 Eureka Server 에 자신의 상태 변경(DOWN) 혹은 자신의 목록 삭제
- Eureka 상에 등록된 이름은
spring.application.name
[실습 Step-4] Eureka Server 실행
Tag : step-4-baseline
1. [준비작업] Eureka Server 띄우기
시간 절약을 위해 미리 준비된 Eureka Server 사용
git reset HEAD --hardgit checkout tags/step-4-baseline -b my-step-4
2. [eurekaserver] 소스 보기
build.gradle
compile('org.springframework.cloud:spring-cloud-starter-netflix-eureka-server')
application.yml : 데모용 각종 설정들
Main Class : @EnableEurekaServer
3. [eurekaserver] 서버 실행
- EurekaServerApplication 실행
- http://localhost:8761/ 확인

[실습 Step-4] Eureka Client 적용하기 - Product 서버
Tag : step-4-eureka-client
1. [product] bulid.gradle
compile('org.springframework.cloud:spring-cloud-starter-netflix-eureka-client')
2. [product] ProductApplication : @EnableEurekaClient
@SpringBootApplication
@EnableEurekaClient
public class ProductApplication {
    public static void main(String[] args) {
        SpringApplication.run(ProductApplication.class);
    }
}
3. [product] application.yml
eureka:
  instance:
    prefer-ip-address: true
OS에서 제공하는 hostname대신 자신의 ip address를 사용하여 등록
4. [display] bulid.gradle
compile('org.springframework.cloud:spring-cloud-starter-netflix-eureka-client')
5. [display] DisplayApplication : @EnableEurekaClient
@SpringBootApplication
@EnableCircuitBreaker
@EnableEurekaClient
public class DisplayApplication {

    @LoadBalanced
    @Bean
    public RestTemplate restTemplate() {
        return new RestTemplate();
    }

    public static void main(String[] args) {
        SpringApplication.run(DisplayApplication.class);
    }
}
6. [display] application.yml
eureka:
  instance:
    prefer-ip-address: true
[실습 Step-4] Eureka Client 적용하기 - 서버 확인
7. Display / Product 서버 둘 다 재시작 후 Eureka 서버 확인

[실습 Step-4] Eureka 서버 주소 직접 명시
8. [product/display] application.yml에 Eureka Server 주소 명시
eureka:
  instance:
    prefer-ip-address: true
  client:
    service-url:
      defaultZone: http://127.0.0.1:8761/eureka  # default address
default 값이 http://127.0.0.1:8761/eureka 이므로 로컬 테스트 시 설정 불필요
9. 정리
@EnableEurekaServer/@EnableEurekaClient를 통해 서버 구축, 클라이언트 Enable 가능하다@EnableEurekaClient를 붙인 Application은 Eureka 서버로 부터 남의 주소를 가져오는 역할과 자신의 주소를 등록하는 역할을 둘다 수행 가능하다- Eureka Client가 Eureka Server에 자신을 등록할 때
spring.application.name이 이름으로 사용된다
[실습 Step-4] RestTemplate에 Eureka 적용하기
Tag : step-4-eureka-listOfServers
1. 목적
- Display -> Product 호출시에 Eureka를 적용하여 ip주소를 코드나 설정 '모두'에서 제거하려고 함
2. [display] application.yml 변경 (주석 처리)
product:
  ribbon:
    #listOfServers: localhost:8082,localhost:7777
    MaxAutoRetries: 0
MaxAutoRetriesNextServer: 1- product.ribbon.listOfServers 제거
- 서버 주소는 Eureka Server에서 가져와라 !
3. [확인] display 서버 재시작
- http://localhost:8081/displays/11111
- Product의 주소가 설정/코드에서 모두 제거
- 코드에서는 http://product/ 으로 접근
4. 정리
@LoadBalanced RestTemplate에는 Ribbon + Eureka 연동- Eureka Client가 설정되면, 코드상에서 서버 주소 대신 Application 이름을 명시해서 호출 가능
- Ribbon의 Load Balancing과 Retry가 함께 동작
'SpringCloud' 카테고리의 다른 글
| [Spring Cloud 를 활용한 MSA 기초] 8. API Gateway - Zuul (0) | 2021.02.07 |
|---|---|
| [Spring Cloud 를 활용한 MSA 기초] 7. Declarative Http Client - Feign (0) | 2021.02.07 |
| [Spring Cloud 를 활용한 MSA 기초] 5. Client LoadBalancer - Ribbon (0) | 2021.02.07 |
| [Spring Cloud 를 활용한 MSA 기초] 4. Circuit Breaker - Hystrix (0) | 2021.02.07 |
| [Spring Cloud 를 활용한 MSA 기초] 3. Cloud Native 이해 (0) | 2021.02.07 |


댓글