🚦 Overview
- 예제에서 사용된 모든 코드는 GitHub 저장소에 공개되어 있습니다
Elastic Stack (v7.10.2 by default)

- Docker swarm mode로 구성
- 모든 컨테이너화된 사용자 정의 애플리케이션은 로그를 Elastic Stack으로 보내기 위해 GELF 로그 드라이버 로 시작하도록 설계됨
📌 참고
- https://docs.docker.com/engine/swarm/
- https://velog.io/@lijahong/series/0%EB%B6%80%ED%84%B0-%EC%8B%9C%EC%9E%91%ED%95%98%EB%8A%94-Docker-Swarm-%EA%B3%B5%EB%B6%80
- https://seongjin.me/tag/docker/
- https://javacan.tistory.com/entry/docker-start-toc
- https://velog.io/@dustndus8/series/%ED%81%B4%EB%9D%BC%EC%9A%B0%EB%93%9C-Docker
- https://velog.io/@korjsh/%EB%8F%84%EC%BB%A4%EC%8A%A4%EC%9B%9C-%EA%B8%B0%EC%B4%88-%EB%B0%8F-%EC%98%88%EC%A0%9C
- https://medium.com/dtevangelist/docker-%EA%B8%B0%EB%B3%B8-7-8-docker-swarm%EC%9D%98-%EA%B5%AC%EC%A1%B0%EC%99%80-service-%EB%B0%B0%ED%8F%AC%ED%95%98%EA%B8%B0-1d5c05967b0d
- 원본 출처
- Docker Swarm 구성 참고
- https://github.com/elastic/stack-docker
- https://github.com/sadok-f/ELK-Stack-logging-demo
- https://github.com/deviantony/docker-elk
- https://github.com/deviantony/docker-elk/wiki/Elasticsearch-cluster
- https://github.com/netman2k/docker-elasticsearch-swarm
- https://github.com/jakubhajek/elasticsearch-docker-swarm
- https://gist.github.com/YildirimMehmet/69dd7fd38f96639f004eab1fc22b550a
- ELK 모니터링 및 관리
🚦 Architecture
| High level design | In scope | Not in scope |
|---|---|---|
 |
로그 파일 및 지표에 대한 비트만 사용됨 모든 로그와 지표는 이 리포지토리에서 직접 elasticsearch로 전달됨 2x Elasticsearch, 1x apm-server 및 1x Kibana가 사용됨 | 수집 노드가 사용되지 않음 |
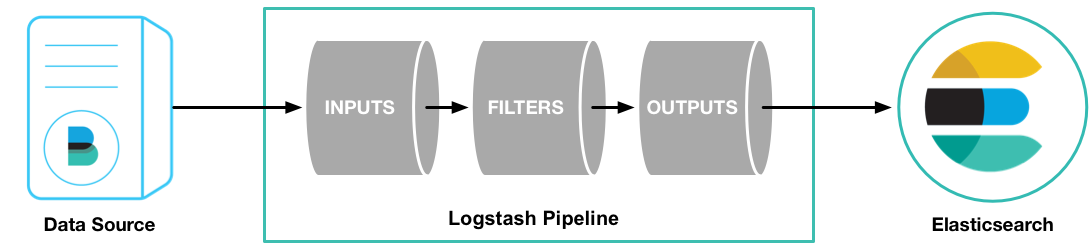 |
모든 컨테이너화된 사용자 정의 애플리케이션은 로그를 Elastic Stack으로 보내기 위해 GELF 로그 드라이버로 시작하도록 설계됨 | - |
🚦 Spac
- Version:
7.10.2
▶︎ Port
9200: Elasticsearch HTTP8200: Apm Server HTTP80: Kibana888: Swarmpit (모니터링 및 Docker Swarm 관리)
▶︎ Path
- ES 데이터 경로:
/home/ubuntu/data/elasticsearch - ES 로그 경로:
/home/ubuntu/log/elasticsearch
▶︎ Plug-in
- Elasticsearch
- Kibana
기본 라이선스에 포함된 무료 기능의 전체 목록 참조: https://www.elastic.co/subscriptions
🚦 EC2 Incetence Configuration
본 구성은 AWS 에서 초기 구성이 완료된 AMI를 바탕으로 진행한다
AMI 환경구성을 하지 않았다면 AMI 환경구성 부터 먼저 진행하기 바란다
- 초기 구성 참고
📕 1. 초기 인스턴스 설정
► 0. AMI로 인스턴스 생성
ELK 서버 셋팅용 AMI 로 인스턴스 생성
- Name
[x86_64][DEV] docker-base-image-v1AMI로 인스턴스 시작 클릭
ELK 서버 셋팅용 AMI 명이 [x86_64][DEV] docker-base-image-v1 라고 가정하고 진행

- 이름
[DEV][이니셜]es-master, 인스턴스 유형t3.medium, 인스턴스 개수3개

- 키페어
elk-dev.pem
보안그룹service_dev,es-cluster-dev
스토리지 20GiB 추가볼륨 20 GiB (기본 8GiB 는 용량이 부족함 도커 이미지 때문에 넉넉히)

- IAM 인스턴스 프로파일
aws-ecr-ec2-role선택
EC2 인스턴스에 ECR 접근 권한 부여

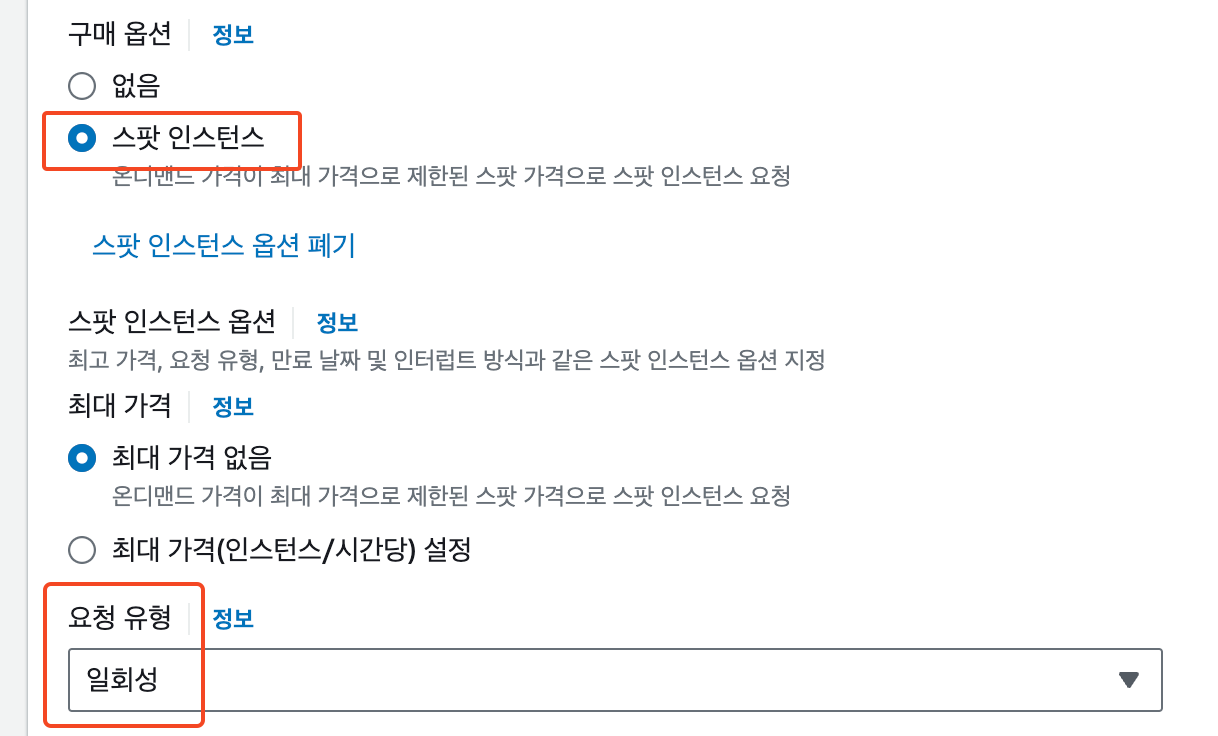
- 구매 옵션
스팟 인스턴스, 요청 유형일회성
구축 테스트 용만 비용 절감 차원에서스팟 인스턴스로 진행
- 인스턴스 시작 클릭

- 생성된 인스턴스 확인 후 두개의 인스턴스는 구분을 위해 각각
es-cluster1,es-cluster2로 Name 변경
퍼블 IPv4 주소에서 세개의 인스턴스 접속 IP 확인
프라이빗 IP 주소도 확인 해둬야됨set-host.sh스크립트에서 사용

- 편하게 접속 하기 위해 퍼블릭 IPv4 주소 alias 에 등록
echo "alias dsh='ssh -i ~/.ssh/aws/elk-dev.pem -l ubuntu'" >> .zshrc
echo "alias es0='dsh ${ES0_IP}'" >> .zshrc
echo "alias es1='dsh ${ES1_IP}'" >> .zshrc
echo "alias es2='dsh ${ES2_IP}'" >> .zshrc
# .zshrc 적용
source ~/.zshrc
# es0~2 까지 순차적으로 접속해서 셋팅 iterm Toggle Broadcasting Input 활용
es0
es1
es2
► 1. 추가 볼륨 마운트 (volume-mount.sh)
volume-mount.sh 스크립트 파일 참고
#!/bin/bash

# AWS EC2 추가 볼륨 자동 마운트 스크립트
# 마운트된 드라이브는 /home/ubuntu/data 에 연결됨

MOUNT_YN=$(df -hT | grep /home/ubuntu/data)
if [ -z "$MOUNT_YN" ];then
    echo -e "\n=== 추가 볼륨 포멧 ==="
    TARGET='nvme1n1'
    ERROR_MESSAGE=$(sudo mkfs -t ext4 /dev/${TARGET} 2>&1 | grep apparently)
    if [ -n "$ERROR_MESSAGE" ];then
        EXCEPT=`echo ${ERROR_MESSAGE:0:13} | sed 's/\/dev\///g'`
        TARGET=`lsblk | grep disk | grep -v ${EXCEPT} | cut -d ' ' -f 1`
        echo ERROR_MESSAGE=$ERROR_MESSAGE, EXCEPT=$EXCEPT, TARGET=$TARGET
        echo "sudo mkfs -t ext4 /dev/${TARGET}"
        sudo mkfs -t ext4 /dev/${TARGET}
    else
        echo TARGET=$TARGET
        echo "sudo mkfs -t ext4 /dev/${TARGET}"
        sudo mkfs -t ext4 /dev/${TARGET}
    fi

    if [ ! -d "/home/ubuntu/data" ];then
        echo -e "\n=== /home/ubuntu/data 디렉토리 생성 ==="
        sudo mkdir -p /home/ubuntu/data
        ls -alt /home/ubuntu | grep data
    fi
    echo -e "\n=== 추가 볼륨 마운트 ==="
    sudo mount /dev/${TARGET} /home/ubuntu/data
    df -hT | grep /home/ubuntu/data
    echo -e "\n=== /home/ubuntu/data 소유자/그룹 변경 ==="
    sudo chown -R 1000:1000 /home/ubuntu/data
    ls -alt /home/ubuntu | grep data
fi

CHECK_FSTAB=$(cat /etc/fstab | grep /home/ubuntu/data)
if [ -z "$CHECK_FSTAB" ];then
    echo -e "\n=== 영구 볼륨 설정 추가 ==="
    sudo bash -c "echo '/dev/${TARGET}    /home/ubuntu/data        ext4   defaults,noatime 0 1' >> /etc/fstab"
    cat /etc/fstab | grep /home/ubuntu/data
fi

echo -e "\n=== 마운트 연결확인 ==="
sudo blkid | grep -v "squashfs"

echo -e "\n=== Docker Mount 디렉토리 생성 ==="
bash -c "~/scripts/make-dirs.sh"- EBS 추가 볼륨을 gp3로 추가
- 볼륨생성시 Docker에 Mount시킬 Directory를 자동으로 생성
$ cd ~/scripts/server-init
$ ./volume-mount.sh
► 2. host 설정 (set-host.sh)
set-host.sh 스크립트 파일 참고
#!/bin/bash

# master host와 hostname을 변경하는 스크립트
# argument: [hostname] [master private ip] [cluster1 private ip] [cluster2 private ip]
# 사용 예시: ./set-host.sh master 10.10.0.1 10.10.0.2 10.10.0.3

if [ -n "$1" ];then
  echo -e "\n=== hostname 등록"
  sudo hostnamectl set-hostname $1
  echo hostname=`hostname`
fi

# 모든 Arguement 대입
PRIVATE_IPS=$*
# 첫번째 Argument를 제외한 Argument
PRIVATE_IPS=${PRIVATE_IPS//$1/}

cnt=0
for PRIVATE_IP in $PRIVATE_IPS; do
    if [ $cnt -eq 0 ];then
        CLUSTER_NAME="master"
    else
        CLUSTER_NAME="cluster${cnt}"
    fi

    EXIST_CLUSTER_NAME=$(sudo cat /etc/hosts | grep ${CLUSTER_NAME})
    echo "CLUSTER_NAME=$CLUSTER_NAME, EXIST_CLUSTER_NAME=$EXIST_CLUSTER_NAME"
    if [ -n "${PRIVATE_IP}" -a -z "${EXIST_CLUSTER_NAME}" ];then
      echo -e "=== ${CLUSTER_NAME} host 등록==="
      sudo bash -c "echo '${PRIVATE_IP} ${CLUSTER_NAME}' >> /etc/hosts"
      echo $(sudo cat /etc/hosts | grep ${CLUSTER_NAME})
    fi
    cnt=$((cnt+1))
done- 각 인스턴스마다
sudo vi /etc/hosts에 master, cluster1, cluster2 호스트 명을 등록해줘야함 - docker swarm node 확인이 용이 하도록 각 서버의
hostname을 변경 - 변경시
cat /etc/hostname변경됨 확인
$ cd ~/scripts/server-init
# master 설정 예시
$ ./set-host.sh master 10.10.0.1 10.10.0.2 10.10.0.3
# cluster1 설정 예시
$ ./set-host.sh cluster1 10.10.0.1 10.10.0.2 10.10.0.3
# cluster2 설정 예시
$ ./set-host.sh cluster2 10.10.0.1 10.10.0.2 10.10.0.3
► 3. BitBucket SSH 키 생성 및 등록 (set-sshkey.sh)
본 예제는 BitBucket 으로 진행했으므로 BitBucket 사용을 기준으로 설명한다
다른 Git 서비스 사용자는 해당 Git 서비스에 맞게 셋팅하면 된다
set-sshkey.sh 스크립트 파일 참고
#!/bin/bash

# Bitbucket 용 ed25519 SSH KEY 발급

SSH_KEY_FILE="/home/ubuntu/.ssh/id_ed25519.pub"
if [ ! -e "${SSH_KEY_FILE}" ];then
    echo "sh-keygen -t ed25519 -b 256"
    ssh-keygen -t ed25519 -b 256
fi
echo -e "\n>> cat ~/.ssh/id_ed25519.pub"
cat ~/.ssh/id_ed25519.pub
Settings - Personal BitBucket setting - SECURITY - SSH Keys - Add Key


$ cd ~/scripts/server-init
$ ./set-sshkey.sh

>> cat ~/.ssh/id_ed25519.pub
ssh-ed25519 AAAAAAAAAAAAAAAAAAAAAAAAAAAAAAAAAAAAAAAAAAAAAAAAAAAAAAAAAAAAAAAAAAAA ubuntu@master
🚫️ 4. AWS 키를 .zshrc에 등록 (EC2 IAM Role 설정X) (set-awskey.sh)
EC2 IAM Role로 권한을 주면 보안에 취약한 AWS KEY를 생성/사용할 필요가 없음
set-awskey.sh 스크립트 파일 참고
AWS_ACCESS_KEY_ID: AAAAAAAAAAAAAAAAAAAAAWS_SECRET_ACCESS_KEY: dddddddddddddddddddddddddddddddddddddddd
$ cd ~/scripts
$ ./set-awskey.sh AAAAAAAAAAAAAAAAAAAA dddddddddddddddddddddddddddddddddddddddd
► 5. sysctl 설정 확인
인스턴스 AMI에 미리 셋팅되어 있으므로 /etc/sysctl.conf 적용이 잘되어있는지 확인만 하면됨
$ cat /etc/sysctl.conf
vm.max_map_count=262144
fs.file-max=131072
vm.swappiness=1

$ sysctl vm.max_map_count
vm.max_map_count=262144
$ sysctl fs.file-max
fs.file-max=131072
$ sysctl vm.swappiness
vm.swappiness=1
🚦 Docker Swarm Configuration
📘 1. ELK 구성 스크립트 Git Clone
home에서 git clone 하여 구축환경 구성
$ cd ~
$ git clone https://github.com/freelife1191/docker-elastic.git
📘 2. Docker Swarm 초기 구축 환경 설정
► 1. 초기 설정 스크립트 수행
init.sh여기서는 이 스크립트만 수행하면 됨env.sh에는 해당 서버에 설정에 필요한 각종 변수들을 보관하고 있으니 참고만 하면 됨preload.sh는init.sh를 수행하면 사전 처리되는 스크립트
환경변수 스크립트 (env.sh)
#!/bin/bash
# Copy this file and set up the env file on the server.
export HOME='/home/ubuntu/docker-elastic'
export PROFILE='dev' # dev, prod
export UID="$(id -u)"
export ELASTIC_VERSION='7.10.2'
export ELASTICSEARCH_USERNAME='elastic'
export ELASTICSEARCH_PASSWORD='elastic'
export SWARMPIT_ADMIN_USERNAME='admin'
export SWARMPIT_ADMIN_PASSWORD='admin'
export ELASTICSEARCH_HOST='master'
export KIBANA_HOST='master'
export CLUSTER1_HOST='cluster1'
export CLUSTER2_HOST='cluster2'
export INITIAL_MASTER_NODES='master'
# AWS_ECR_PRIVATE_DOMAIN URL은 각자 사용하는 AWS 계정에 맞게 수정해야 된다
if [[ "${PROFILE}" == "prod" ]];then
    export ELASTICSEARCH_JVM_MEMORY='20g' # prod 20g
    export ELASTICSEARCH_UPDATE_DELAY='120s' # prod 120s
    export AWS_ECR_PRIVATE_DOMAIN='2XXXXXXXXXXX.dkr.ecr.ap-northeast-2.amazonaws.com'
else
    export ELASTICSEARCH_JVM_MEMORY='1g' # prod 20g
    export ELASTICSEARCH_UPDATE_DELAY='60s' # prod 120s
    export AWS_ECR_PRIVATE_DOMAIN='3XXXXXXXXXXX.dkr.ecr.ap-northeast-2.amazonaws.com'
fi
사전 실행 스크립트 (preload.sh)
#!/bin/bash

# 기본 환경 변수 가져오기
HOME='/home/ubuntu/docker-elastic'
export ENV="${HOME}/env.sh"

echo "SET OK"
source ${ENV}


# 설정된 환경변수들을 출력
ENVIRONMENTS="HOME PROFILE UID ELASTIC_VERSION ELASTICSEARCH_USERNAME ELASTICSEARCH_PASSWORD SWARMPIT_ADMIN_USERNAME SWARMPIT_ADMIN_PASSWORD
ELASTICSEARCH_HOST KIBANA_HOST CLUSTER1_HOST CLUSTER2_HOST INITIAL_MASTER_NODES ELASTICSEARCH_JVM_MEMORY ELASTICSEARCH_UPDATE_DELAY AWS_ECR_PRIVATE_DOMAIN"
for ENVIRONMENT in $ENVIRONMENTS; do
    bash -c "echo ${ENVIRONMENT}=$(eval echo \$${ENVIRONMENT})"
done

if [ ! -e "${ENV}" ];then
    echo "The env file is required to run init.sh."
    exit 1
fi
초기 셋팅 스크립트 (init.sh)
#!/bin/bash

# 사전 실행 스크립트
bash /home/ubuntu/docker-elastic/scripts/preload.sh

# 기본 환경 변수 가져오기
HOME='/home/ubuntu/docker-elastic'
ENV_TEMPLATE="${HOME}/env-template.sh"
ENV="${HOME}/env.sh"
source ${ENV}

PROFILE=${PROFILE}
echo "PROFILE=${PROFILE}"

if [ -z "${PROFILE}" ];then
   echo ">> Entering profile is required :: Inputable profile [dev, prod]"
   exit 1
fi

# env 파일이 없으면 env 파일을 생성한다
# docker-elastic 스크립트들은 모두 env.sh 파일로부터 환경변수를 받아온다
if [ ! -e "${ENV}" ];then
    cp ${ENV_TEMPLATE} ${ENV}
    # GET IP 스크립트 추가
    bash -c "echo export alias getip=\'bash -c ~/docker-elastic/scripts/service-init/get-ip.sh\' >> ~/.zshrc"
fi

if [ ! -e "${ENV}" ];then
    echo "The 'env.sh' file was not created."
    echo "The 'env.sh' file is a file that must be created."
    exit 1
fi

# timezone 설정
# https://www.lesstif.com/lpt/ubuntu-linux-timezone-setting-61899162.html
## timezonectl 사용 한국으로 설정
sudo timedatectl set-timezone 'Asia/Seoul'
## tzdata 설치
sudo apt install tzdata -y
## tzdata 를 ln 으로 링크 symbolic link
sudo ln -sf /usr/share/zoneinfo/Asia/Seoul /etc/localtime
내부통신 방화벽 추가
- 도커 스웜 모드 매니저 노드의 기본포트(TCP): 2377
- 작업자 노드 간의 통신(TCP/UDP): 7946
- 인그레스 오버레이 네트워크(TCP/UDP): 4789
- Elasticsearch 전송 포트: 9300 ~ 9399
- Elasticsearch HTTP 포트: 9200 ~ 9299
- Logstash Beats input: 5044
- Logstash TCP input: 50000
- Logstash monitoring API: 9600
- Logstash Container log Transfer: 12201
- Kibana: 5601
초기 환경 변수는
init.sh스크립트에서env-template.sh파일을 참고하여env.sh를 생성 설정
수정할 부분이 있다면 스크립트 파일의 환경변수를 수정
$ cd scripts

# 개발환경 초기 셋팅 예시 운영환경 초기 셋팅은 Argument로 'prod' 를 입력
# 설정된 환경변수 값과 Docker Swarm Join Key가 출력된다
$ ./init.sh

SET OK
HOME=/home/ubuntu/docker-elastic
PROFILE=dev
UID=1000
ELASTIC_VERSION=7.10.2
ELASTICSEARCH_USERNAME=elastic
ELASTICSEARCH_PASSWORD=elastic
SWARMPIT_ADMIN_USERNAME=admin
SWARMPIT_ADMIN_PASSWORD=admin
ELASTICSEARCH_HOST=master
KIBANA_HOST=master
CLUSTER1_HOST=cluster1
CLUSTER2_HOST=cluster2
INITIAL_MASTER_NODES=master
ELASTICSEARCH_JVM_MEMORY=1g
ELASTICSEARCH_UPDATE_DELAY=60s
AWS_ECR_PRIVATE_DOMAIN=3XXXXXXXXXXX.dkr.ecr.ap-northeast-2.amazonaws.com
► 2. AWS CLI를 설치하고 ECR Login을 테스트
AWS 인스턴스에서 Elastic Container Registry 서비스의 Private Repository를 사용하기 위해서는 ECR Login 처리가 필요한데
한번 로그인 시 12시간이 유지되므로 주기적으로 ECR Login 처리를 해주어 Login 상태를 유지해줘야함
이 작업은 반드시
master,cluster1,cluster2모든 서버에 모두 해주어야 한다
Elastic Stack 에서 해당 서버의 Volume 을 직접 참조하는 설정이 있어 Git Repository 동기화가 이루어지지 않고 있으면 문제가 발생할 수 있다
ECR 로그인 스크립트 (ecr-login.sh)
ecr-login.sh 스크립트 파일 참고
#!/bin/bash

## ECR 로그인

# 사전 실행 스크립트
bash /home/ubuntu/docker-elastic/scripts/preload.sh

# 기본 환경 변수 가져오기
HOME='/home/ubuntu/docker-elastic'
ENV="${HOME}/env.sh"
source ${ENV}

if [ -z "${AWS_ECR_PRIVATE_DOMAIN}" ];then
   echo ">> Is Required AWS_ECR_PRIVATE_DOMAIN :: excute init.sh"
   exit 1
fi

AWSCLI_INSTALL=$(aws --version 2>&1 | grep aws-cli | wc -l)

# 만약 AWS CLI2가 설치되지 않았다면
if [ "$AWSCLI_INSTALL" -ne 1 ];then
  echo ">> AWS CLI2 설치" #| tee -a deploy.log
  # Ubuntu AWS CLI2 설치
  sudo apt update && \
  sudo apt-get install unzip -y && \
  curl "https://awscli.amazonaws.com/awscli-exe-linux-x86_64.zip" -o "${HOME}/scripts/awscliv2.zip" && \
  sudo unzip ${HOME}/scripts/awscliv2.zip && \
  sudo ${HOME}/scripts/aws/install
  sudo rm ${HOME}/scripts/awscliv2.zip
  sudo rm -rf ${HOME}/scripts/aws
fi

echo ">> aws ecr get-login-password --region ap-northeast-2 | docker login --username AWS --password-stdin ${AWS_ECR_PRIVATE_DOMAIN}" #| tee -a deploy.log
aws ecr get-login-password --region ap-northeast-2 | docker login --username AWS --password-stdin ${AWS_ECR_PRIVATE_DOMAIN} #| tee -a deploy.log
► 3. 1분마다 동작하는 Cronjob 등록
해당 스크립트의 상단에 있는 스크립트를 설정에 맞게 복사해서 crontab 에 붙여 넣으면됨
# crontab 편집기 모드 열기
$ crontab -e

# 1분마다 cron-start.sh 실행
*/1 * * * * sudo -u ubuntu /home/ubuntu/docker-elastic/scripts/cron-start.sh 2>&1 | tee /home/ubuntu/docker-elastic/crontab.log
이 작업은 반드시
master,cluster1,cluster2모든 서버에 모두 해주어야 한다
Elastic Stack 에서 해당 서버의 Volume 을 직접 참조하는 설정이 있어 Git Repository 동기화가 이루어지지 않고 있으면 문제가 발생할 수 있다
크론잡 실행 스크립트 (cron-start.sh)
아래의 CronJob 들을 수행
- ECR 로그인
- Kibana ECR 이미지 Pull
- Elasticsearch ECR 이미지 Pull
- ELK 스크립트 Repository Git Pull
cron-start.sh 스크립트 파일 참고
#!/bin/bash

# Crontab에 등록해서 주기적으로 실행

#* * * * * sudo -u ubuntu /home/ubuntu/docker-elastic/scripts/cron-start.sh 2>&1 | tee /home/ubuntu/docker-elastic/crontab.log
# 1시간마다 cron-start.sh
#0 */1 * * * sudo -u ubuntu /home/ubuntu/docker-elastic/scripts/cron-start.sh 2>&1 | tee /home/ubuntu/docker-elastic/crontab.log
# 1분마다 cron-start.sh
#*/1 * * * * sudo -u ubuntu /home/ubuntu/docker-elastic/scripts/cron-start.sh 2>&1 | tee /home/ubuntu/docker-elastic/crontab.log

# 사전 실행 스크립트
bash /home/ubuntu/docker-elastic/scripts/preload.sh

# 기본 환경 변수 가져오기
HOME='/home/ubuntu/docker-elastic'
ENV="${HOME}/env.sh"
source ${ENV}

# ECR 로그인
echo "[$(date '+%Y-%m-%d %H:%M:%S')][STEP-0] ecr-login cron execute" | tee ${HOME}/cron.log
#sudo -u ubuntu /home/ubuntu/docker-elastic/scripts/ecr-login.sh 2>&1 | tee -a ${HOME}/cron.log

bash ${HOME}/scripts/ecr-login.sh 2>&1 | tee -a ${HOME}/cron.log

# Kibana ECR 이미지 Pull
echo "[$(date '+%Y-%m-%d %H:%M:%S')][STEP-1] docker pull ${AWS_ECR_PRIVATE_DOMAIN}/kibana:${ELASTIC_VERSION}" | tee -a ${HOME}/cron.log
docker pull ${AWS_ECR_PRIVATE_DOMAIN}/kibana:${ELASTIC_VERSION} 2>&1 | tee -a ${HOME}/cron.log

# Elasticsearch ECR 이미지 Pull
echo "[$(date '+%Y-%m-%d %H:%M:%S')][STEP-2] docker pull ${AWS_ECR_PRIVATE_DOMAIN}/elasticsearch:${ELASTIC_VERSION}" | tee -a ${HOME}/cron.log
docker pull ${AWS_ECR_PRIVATE_DOMAIN}/elasticsearch:${ELASTIC_VERSION} 2>&1 | tee -a ${HOME}/cron.log

# ELK 스크립트 최신 업데이트
echo "[$(date '+%Y-%m-%d %H:%M:%S')][STEP-3] git -C ${HOME} pull" | tee -a ${HOME}/cron.log
git -C ${HOME} pull 2>&1 | tee -a ${HOME}/cron.log
► 4. Docker Swarm 초기 설정 (docker-swarm-init.sh)
docker swarm 활성화 확인
$ docker info | grep Swarm
Swarm: inactive
master 노드에서만 실행한다 (worker 노드들은 Join 되면 자동으로 전파됨)
$ ./docker-swarm-init.shdocker-swarm-init.sh 스크립트 파일 참고
#!/bin/bash

# 사전 실행 스크립트
# bash /home/ubuntu/docker-elastic/scripts/preload.sh

# docker swarm init 및 join-token 발급
# 발급된 join-token을 각 worker node 에서 실행시켜서 join 시켜줘야됨


if [ "$PROFILE" != "prod" ];then
    PUBLIC_IP=$(curl -s 'http://169.254.169.254/latest/meta-data/public-ipv4')
fi
PRIVATE_IP=$(curl -s 'http://169.254.169.254/latest/meta-data/local-ipv4')

SWARM_MODE=$(docker info | grep Swarm | sed -e 's/^ *//g' -e 's/ *$//g')
if [ "${SWARM_MODE}" == "Swarm: inactive" ];then
    # 도커 스웜 매니저 서버 기준으로 클러스터를 시작하도록 설정
    docker swarm init --advertise-addr ${PRIVATE_IP} --listen-addr ${PRIVATE_IP}:2377
else
    # 다중 워커 노드 추가 조인 키 조회
    docker swarm join-token worker
    # 다중 매니저 노드 추가 조인 키 조회
    #docker swarm join-token manager
fi
Swarm initialized: current node (yky9nyzqwe82vc1ofu4grnbyz) is now a manager.
To add a worker to this swarm, run the following command:
# 각 워커 노드에서 아래의 명령어로 하나의 클러스터로 합류 시킬 수 있음
# 아래의 스크립트를 복사해서 master 를 제외한 각 worker 노드 서버에서 실행시켜 준다
docker swarm join --token SWMTKN-1-36c3nveukaxto9rhcl1kiul71t18kowritmr4534q7h3qbwvmy-aydkxf0l89w70hh4s6ylrxwk9 10.10.0.1:2377
To add a manager to this swarm, run 'docker swarm join-token manager' and follow the instructions.init.sh 스크립트를 수행해서 생성된 docker swarm join 스크립트를 복사해서 각 노드 서버에서 실행시켜 주면 각 노드 서버가 Docker Swarm 의 Worker 노드로 합류된다
매니저 노드에서 작업자 노드의 연결을 확인
$ docker node ls
ID                            HOSTNAME   STATUS    AVAILABILITY   MANAGER STATUS   ENGINE VERSION
xn2sqzj4kha5kr213o1phgcng     cluster1   Ready     Active                          24.0.6
aukawhrswdwtvjawv2in2so4a     cluster2   Ready     Active                          24.0.6
kx16jv30usuni5kdej14whqpd *   master     Ready     Active         Leader           24.0.6
매니저 노드가 1개일때 매니저 노드가 장애가 나면 크리티컬한 문제가 발생하므로 모든 작업자 노드를 매니저 노드로 승격시킨다
작업자 노드를 매니저 노드로 승격 시키면 Manager Status가 Reachable 표시 된다
이렇게 설정 해두면 master 매니저 노드가 사용불능 상태일때 Docker Swarm이 빠르게 판단하여 Reachable 상태의 매니저 노드를 Leader로 승격 시킨다
# docker node cluster1을 작업자 노드에서 매니저 노드로 승격
$ docker node promote cluster1
# docker node cluster2을 작업자 노드에서 매니저 노드로 승격
$ docker node promote cluster2

$ docker node ls
ID                            HOSTNAME   STATUS    AVAILABILITY   MANAGER STATUS   ENGINE VERSION
xn2sqzj4kha5kr213o1phgcng     cluster1   Ready     Active         Reachable        24.0.6
aukawhrswdwtvjawv2in2so4a     cluster2   Ready     Active         Reachable        24.0.6
kx16jv30usuni5kdej14whqpd *   master     Ready     Active         Leader           24.0.6
스웜 모드 상태 조회에서 활성화 상태와 도커 스웜 모드 세부 정보 확인
$ docker info
 ...
 Swarm: active
  NodeID: avphq49o2b83u480oe7srxl80
  Is Manager: true
  ClusterID: 2z8rls8vew0x32qwszdel8i12
  Managers: 1
  Nodes: 4
  Default Address Pool: 10.0.0.0/8
  SubnetSize: 24
  Data Path Port: 4789
  Orchestration:
   Task History Retention Limit: 5
  ...
docker swarm 활성화 다시 확인
$ docker info | grep Swarm
Swarm: active
📘 3. Swarmpit 설치
모든 Stack 설치시 master 노드에서만 진행하면 된다
worker노드로는master노드에서 배포하면 자동으로 전파되기 때문에worker노드에서는 Stack 설치를 진행할 필요가 없다
- Docker Swarm 모니터링 오픈소스: https://swarmpit.io

도커 스웜피트 접속 주소 http://PUBLIC_IP:888 패스워드는 스크립트에 설정되어 있으니 참고
현재 사용중인 모든 클러스터 노드의 서비스 컨테이너 정보를 확인
다양한 메뉴를 가지고 있고 대시보드를 통해 전체 자원 사용량 체크
실행 중인 특정 서비스의 세부 정보까지 확인
한가지 단점이 있다면 Swarmpit Timezone 설정을 변경할 수 없어서 UTC 기준으로 볼 수 밖에 없다
Swarmpit Docker Compose (swarmpit-docker-compose.yml)
- swarmpit-docker-compose.yml docker compose 설정 참고
version: '3.8'

services:
  app:
    image: swarmpit/swarmpit:latest
    environment:
      - SWARMPIT_DB=http://db:5984
      - SWARMPIT_INFLUXDB=http://influxdb:8086
      - INTERACTIVE=0
      - ADMIN_USERNAME=${SWARMPIT_ADMIN_USERNAME}
      - ADMIN_PASSWORD=${SWARMPIT_ADMIN_PASSWORD}
      - TZ=Asia/Seoul
    volumes:
      - /var/run/docker.sock:/var/run/docker.sock:ro
      - /etc/localtime:/etc/localtime:ro
    ports:
      - 888:8080
    healthcheck:
      test: ["CMD", "curl", "-f", "http://localhost:8080"]
      interval: 60s
      timeout: 10s
      retries: 3
    networks:
      - net
    deploy:
      resources:
        limits:
          cpus: '0.50'
          memory: 1024M
        reservations:
          cpus: '0.25'
          memory: 512M
      placement:
        constraints:
          - node.role == manager

  db:
    image: couchdb:2.3.0
    environment:
      - TZ=Asia/Seoul
    volumes:
      - /etc/localtime:/etc/localtime:ro
      - db-data:/opt/couchdb/data
    networks:
      - net
    deploy:
      resources:
        limits:
          cpus: '0.30'
          memory: 256M
        reservations:
          cpus: '0.15'
          memory: 128M

  influxdb:
    image: influxdb:1.8
    environment:
      - TZ=Asia/Seoul
    volumes:
      - /etc/localtime:/etc/localtime:ro
      - influx-data:/var/lib/influxdb
    networks:
      - net
    deploy:
      resources:
        limits:
          cpus: '0.60'
          memory: 512M
        reservations:
          cpus: '0.30'
          memory: 128M

  agent:
    image: swarmpit/agent:latest
    environment:
      - DOCKER_API_VERSION=1.35
      - TZ=Asia/Seoul
    volumes:
      - /var/run/docker.sock:/var/run/docker.sock:ro
      - /etc/localtime:/etc/localtime:ro
    networks:
      - net
    deploy:
      mode: global
      labels:
        swarmpit.agent: 'true'
      resources:
        limits:
          cpus: '0.10'
          memory: 64M
        reservations:
          cpus: '0.05'
          memory: 32M

networks:
  net:
    driver: overlay

volumes:
  db-data:
    driver: local
  influx-data:
    driver: local
Swarmpit 배포 스크립트 (deployStackSwarmpit.sh)
- deployStackSwarmpit.sh 스크립트 참고
#!/bin/bash

# 사전 실행 스크립트
bash /home/ubuntu/docker-elastic/scripts/preload.sh

# 기본 환경 변수 가져오기
HOME='/home/ubuntu/docker-elastic'
ENV="${HOME}/env.sh"
source ${ENV}

# docker compose로 배포
docker stack deploy --compose-file swarmpit-docker-compose.yml swarmpit
실행
$ ./deployStackSwarmpit.shDocker Swarmpit는 Docker Stack으로 구동되며 app, agent, db, influxdb의 4개 스택으로 구성되어 있음
$ docker stack ps --no-trunc swarmpit🚦 ELK Configuration
이미 Elasticsearch, Kibana ECR 이미지를 생성해서 PUSH 했다면 반복해서 진행할 필요는 없다
📗 1. ELK 이미지 빌드 (최초에만 생성 이미 생성되어 있음)

플러그인 설치를 위해 기본 이미지에 플러그인을 설치한 별도의 Docker 이미지를 생성하여 ECR에 PUSH
► 1. Elasticsearch 이미지 빌드 (최초에만 생성 이미 생성되어 있음)
Elasticsearch (Dockerfile)
elk/elasticsearch/Dockerfile 스크립트 참고
ARG ELASTIC_VERSION

# https://www.docker.elastic.co/
FROM docker.elastic.co/elasticsearch/elasticsearch:${ELASTIC_VERSION}

# Add your elasticsearch plugins setup here
# Example: RUN elasticsearch-plugin install analysis-icu
RUN elasticsearch-plugin install analysis-icu
RUN elasticsearch-plugin install analysis-nori

# https://opendistro.github.io/for-elasticsearch-docs/docs/install/plugins/
# https://opendistro.github.io/for-elasticsearch-docs/docs/install/docker/
COPY alerting.zip /tmp/
RUN elasticsearch-plugin install -b file:///tmp/alerting.zip

# https://github.com/netcrazy/elasticsearch-jaso-analyzer
COPY jaso-analyzer-plugin-7.10.2-plugin.zip /tmp/
RUN elasticsearch-plugin install file:///tmp/jaso-analyzer-plugin-7.10.2-plugin.zip
Elasticsearch 공통 빌드 스크립트 (buildCommon.sh)
buildCommon.sh 스크립트 파일 참고
Elasticsearch 빌드 스크립트 (buildElastic.sh)
- bildElastic.sh 스크립트 참고
#!/bin/bash

# 사전 실행 스크립트
bash /home/ubuntu/docker-elastic/scripts/preload.sh

# 기본 환경 변수 가져오기
HOME='/home/ubuntu/docker-elastic'
ENV="${HOME}/env.sh"
source ${ENV}

# elasticsearch ecr 이미지 빌드 스크립트
export APP_NAME='elasticsearch'

bash ${HOME}/scripts/buildCommon.sh
실행
$ cd scripts
$ ./buildElastic.sh
► 2. Kibana 이미지 빌드 (최초에만 생성 이미 생성되어 있음)
Kibana (Dockerfile)
elk/kibana/Dockerfile 스크립트 파일 참고
ARG ELASTIC_VERSION

# https://www.docker.elastic.co/
FROM docker.elastic.co/kibana/kibana:${ELASTIC_VERSION}

# https://opendistro.github.io/for-elasticsearch-docs/docs/install/plugins/
# https://opendistro.github.io/for-elasticsearch-docs/docs/install/docker/
RUN kibana-plugin install https://github.com/opendistro-for-elasticsearch/alerting-kibana-plugin/releases/download/v1.13.0.0/opendistroAlertingKibana-1.13.0.0.zip
Kibana 공통 빌드 스크립트 (buildCommon.sh)
buildCommon.sh 스크립트 파일 참고
Kibana 빌드 스크립트 (buildKibana.sh)
buildKibana.sh 스크립트 파일 참고
#!/bin/bash

# 사전 실행 스크립트
bash /home/ubuntu/docker-elastic/scripts/preload.sh

# 기본 환경 변수 가져오기
HOME='/home/ubuntu/docker-elastic'
ENV="${HOME}/env.sh"
source ${ENV}

# kibana ecr 이미지 빌드 스크립트
export APP_NAME='kibana'

bash ${HOME}/scripts/buildCommon.sh
실행
$ cd scripts
$ ./buildKibana.sh
📗 2. ELK Stack 구축
다시 한번 강조하자면 모든 Stack 설치시 master 노드에서만 진행하면 된다
worker노드로는master노드에서 배포하면 자동으로 전파되기 때문에worker노드에서는 Stack 설치를 진행할 필요가 없다
► 1. Elastic Stack 배포
Elastic Stack Docker Compose (docker-compose.dev.yml)
docker-compose.dev.yml 스크립트 파일 참고
version: "3.8"

# 10 Things to Consider When Planning Your Elasticsearch Project: https://ecmarchitect.com/archives/2015/07/27/4031
# Using Apache JMeter to Test Elasticsearch: https://ecmarchitect.com/archives/2014/09/02/3915

services:

  swarm-listener:
    image: dockerflow/docker-flow-swarm-listener:latest
    hostname: swarm-listener
    networks:
      - elastic
    volumes:
      - "/var/run/docker.sock:/var/run/docker.sock"
      - /etc/localtime:/etc/localtime:ro
     nvironment:
      - DF_NOTIFY_CREATE_SERVICE_URL=http://proxy:8080/v1/docker-flow-proxy/reconfigure
      - DF_NOTIFY_REMOVE_SERVICE_URL=http://proxy:8080/v1/docker-flow-proxy/remove
      - TZ=Asia/Seoul
    deploy:
      placement:
        max_replicas_per_node: 1
        constraints: [node.role == manager]

  proxy:
    image: dockerflow/docker-flow-proxy:latest
    hostname: proxy
    ports:
      - "80:80"
      - "443:443"
      - "9200:9200"
    networks:
      - elastic
    volumes:
      - /etc/localtime:/etc/localtime:ro
    environment:
      - LISTENER_ADDRESS=swarm-listener
      - MODE=swarm
      - BIND_PORTS=9200
      - TZ=Asia/Seoul
    deploy:
      replicas: 2
      update_config:
        parallelism: 2
        delay: 10s
      restart_policy:
        condition: on-failure

  elasticsearch:
    image: ${AWS_ECR_PRIVATE_DOMAIN}/elasticsearch:${ELASTIC_VERSION}
    environment:
      # https://github.com/docker/swarmkit/issues/1951
      - node.name={{.Node.Hostname}}
      - bootstrap.memory_lock=true # 아래 memlock 설정과 함께 스와핑을 비활성화
      - ES_JAVA_OPTS=-Xms${ELASTICSEARCH_JVM_MEMORY} -Xmx${ELASTICSEARCH_JVM_MEMORY}
      - discovery.seed_hosts=elasticsearch
      - cluster.initial_master_nodes=${INITIAL_MASTER_NODES}
      - cluster.name=elastic
      - network.host=0.0.0.0
      - xpack.license.self_generated.type=basic
      - xpack.security.enabled=false
      - xpack.monitoring.collection.enabled=false
      - xpack.security.audit.enabled=false
      - action.auto_create_index=true
      - ELASTIC_PASSWORD=${ELASTICSEARCH_PASSWORD}
      - TZ=Asia/Seoul
    ulimits:
      nproc:
        soft: 65536
        hard: 65536
      nofile:
        soft: 65536
        hard: 65536
      memlock:
        soft: -1
        hard: -1
    networks:
      - elastic
    configs:
      - source: elastic_log4j2
        target: /usr/share/elasticsearch/config/log4j2.properties
    volumes:
      - elasticsearch:/usr/share/elasticsearch/data
      - elasticsearch-log:/usr/share/elasticsearch/logs
      - /etc/localtime:/etc/localtime:ro
      - elasticsearch-analysis:/usr/share/elasticsearch/config/analysis:rw
    deploy:
      mode: 'global'
      endpoint_mode: dnsrr
      labels:
        - com.df.notify=true
        - com.df.distribute=true
        - com.df.servicePath=/
        - com.df.port=9200
        - com.df.srcPort=9200
      # 옵션 참고: https://2mukee.tistory.com/295
      update_config: # 서비스 업데이트 구성 방법
        # 한 번에 업데이트할 컨테이너 수
        parallelism: 1
        delay: ${ELASTICSEARCH_UPDATE_DELAY} # 기본값=0 / 각 컨테이너 그룹 업데이트 사이 대기 시간
        monitor: ${ELASTICSEARCH_UPDATE_DELAY} # 기본값=0 / 각 작업 업데이트 후 실패를 모니터링 하기 위한 시간<단위에 표시> / ns, us, ms, s, m, h
        failure_action: rollback # 기본값=pause / 업데이트 실패 시 수행할 작업 / continue, rollback, pause
        order: start-first # 기본값=stop-first / 업데이트 중 작업 순서 / stop-first <새 작업 실행전 오래된 작업 중지>, start-first<새 작업 실행 후 실행중 작업에 중첩되어 이전 작업 실행
      restart_policy: # 컨테이너가 종료 될때 컨테이너를 다시 시작하는 여부
        condition: on-failure # none(설정안함), on-failure(장애 발생시), any (기본 값 / 어떤 상황이든)

  kibana:
    image: ${AWS_ECR_PRIVATE_DOMAIN}/kibana:${ELASTIC_VERSION}
    hostname: "{{.Node.Hostname}}-kibana"
    environment:
      - ELASTICSEARCH_URL=http://elasticsearch:9200
      - ELASTICSEARCH_USERNAME=${ELASTICSEARCH_USERNAME}
      - ELASTICSEARCH_PASSWORD=${ELASTICSEARCH_PASSWORD}
      - SERVER_NAME="{{.Node.Hostname}}-kibana"
      - monitoring.ui.container.elasticsearch.enabled=true
      - monitoring.ui.container.logstash.enabled=true
      - TZ=Asia/Seoul
    networks:
      - elastic
    volumes:
      - kibana:/usr/share/kibana/data
      - kibana-log:/usr/share/kibana/logs
      - /etc/localtime:/etc/localtime:ro
    deploy:
      placement:
        max_replicas_per_node: 1
        constraints: [node.role == manager]
      labels:
        - com.df.notify=true
        - com.df.distribute=true
        - com.df.servicePath=/
        - com.df.port=5601
        - com.df.srcPort=80

networks:
  elastic:
    external: true

volumes:
  elasticsearch:
    driver: local
    driver_opts:
      o: bind
      type: none
      device: /home/ubuntu/data/elasticsearch
  elasticsearch-log:
    driver: local
    driver_opts:
      o: bind
      type: none
      device: /home/ubuntu/log/elasticsearch
  elasticsearch-analysis:
    driver: local
    driver_opts:
      o: bind
      type: none
      device: $PWD/elk/elasticsearch/config/analysis
  kibana:
    driver: local
    driver_opts:
      type: none
      o: bind
      device: /home/ubuntu/data/kibana
  kibana-log:
    driver: local
    driver_opts:
      type: none
      o: bind
      device: /home/ubuntu/log/kibana

configs:
  elastic_log4j2:
    file: $PWD/elk/elasticsearch/config/log4j2.properties
Elastic Stack 배포 스크립트 (deployStack.sh)
- deployStack.sh 스크립트 파일 참고
#!/bin/bash

# ELK Stack 배포 스크립트

# 사전 실행 스크립트
bash /home/ubuntu/docker-elastic/scripts/preload.sh

# 기본 환경 변수 가져오기
HOME='/home/ubuntu/docker-elastic'
ENV="${HOME}/env.sh"
source ${ENV}

EXIST_NETWORK=$(docker network ls | grep $ELASTICSEARCH_USERNAME)
# 생성된 network가 없으면
if [ -z "$EXIST_NETWORK" ]; then
    echo ">> docker network create --driver overlay --attachable ${ELASTICSEARCH_USERNAME}"
    docker network create --driver overlay --attachable ${ELASTICSEARCH_USERNAME}
fi

echo ">> docker stack deploy --compose-file docker-compose.yml elastic"
docker stack deploy --with-registry-auth --compose-file docker-compose."${PROFILE}".yml elastic

# elasticsearch 노드 전체 aws login 인증 정보 전파
#echo ">> docker service update -d -q --with-registry-auth elastic_elasticsearch"
#docker service update -d -q --with-registry-auth elastic_elasticsearch
#echo ">> docker service update -d -q --with-registry-auth elastic_kibana"
#docker service update -d -q --with-registry-auth elastic_kibana
elastic stack 배포
elasticsearchlogstashkibanaswarm-listenerproxyapm-server
$ ./deployStack.sh배포 서비스 확인
$ ./docker stack services elastic배포 로그 확인
$ ./docker stack ps --no-trunc elasticElastic Stack 상태 정보 확인 (getHealth.sh)
getHealth.sh 스크립트 파일 참고
#!/bin/bash

# 사전 실행 스크립트
bash /home/ubuntu/docker-elastic/scripts/preload.sh

# 기본 환경 변수 가져오기
HOME='/home/ubuntu/docker-elastic'
ENV="${HOME}/env.sh"
source ${ENV}

echo -e "\n=== health ==="
curl -XGET -u ${ELASTICSEARCH_USERNAME}:${ELASTICSEARCH_PASSWORD} ${ELASTICSEARCH_HOST}':9200/_cat/health?v&pretty'

echo -e "\n=== indices ==="
curl -XGET -u ${ELASTICSEARCH_USERNAME}:${ELASTICSEARCH_PASSWORD} ${ELASTICSEARCH_HOST}':9200/_cat/indices?v&pretty'
$ ./getHealth.sh
=== health ===
epoch timestamp cluster status node.total node.data shards pri relo init unassign pending_tasks max_task_wait_time active_shards_percent
1694760889 06:54:49 elastic green 3 3 20 13 0 0 0 0 - 100.0%
=== indices ===
health status index uuid pri rep docs.count docs.deleted store.size pri.store.size
green open apm-7.10.2-metric-000001 vE45PtuYQ_Sxp1WYz5AC_A 1 0 0 0 208b 208b
green open apm-7.10.2-transaction-000001 VdZ5Fn6tTnOVsYLtpUwYiQ 1 0 0 0 208b 208b
green open apm-7.10.2-span-000001 4LIyhK46QaWyzphQD1OSsw 1 0 0 0 208b 208b
green open .apm-custom-link 5TnLPBqdRBitAl44xEBQwQ 1 1 0 0 416b 208b
green open .kibana_task_manager_1 F71pJqmOT2Gj-oJ52t_eNQ 1 1 5 39 155.3kb 58.5kb
green open apm-7.10.2-onboarding-2023.09.15 KZ-0LDHrTVGy3IZ4DKB0Ew 1 0 1 0 7kb 7kb
green open .apm-agent-configuration xxoapfJBRQSAiBBArEA2EQ 1 1 0 0 416b 208b
green open apm-7.10.2-profile-000001 u9J_K8UnTJiOMurk-iTWzA 1 0 0 0 208b 208b
green open logstash-2023.09.15-000001 Pp7pZxbdS6OwYk9_QqcPww 1 1 0 0 416b 208b
green open .kibana_1 Af5G0poQQS2haHpGv3N1qw 1 1 2143 2356 6.7mb 3.3mb
green open .kibana-event-log-7.10.2-000001 2p8FQ0LORIGomGKlVbuWsg 1 1 1 0 11.2kb 5.6kb
green open apm-7.10.2-error-000001 -JSbO-hPQZioO9HwgSDINA 1 0 0 0 208b 208bElasticsearch 접속 확인
{
  "name" : "es-master",
  "cluster_name" : "elastic",
  "cluster_uuid" : "v6uJ4de1T9W7Xbegh_p9TQ",
  "version" : {
    "number" : "7.10.2",
    "build_flavor" : "default",
    "build_type" : "docker",
    "build_hash" : "747e1cc71def077253878a59143c1f785afa92b9",
    "build_date" : "2021-01-13T00:42:12.435326Z",
    "build_snapshot" : false,
    "lucene_version" : "8.7.0",
    "minimum_wire_compatibility_version" : "6.8.0",
    "minimum_index_compatibility_version" : "6.0.0-beta1"
  },
  "tagline" : "You Know, for Search"
}
Elastic Stack 중지 스크립트 (removeStack.sh)
removeStack.sh 스크립트 파일 참고
#!/bin/bash

docker stack rm elastic
$ ./removeStack.shElastic Stack 단일 서비스 재기동
$ docker service update --force --with-registry-auth stack_service_namekibana 재기동 예시
$ docker service update --force --with-registry-auth elastic_kibana► 2. Beats 일괄배포/중지
Beats 일괄배포 스크립트 (deployBeats.sh)
deployBeats.sh Beats 일괄배포
#!/bin/bash

# ./deployStackAuditbeat.sh
./deployStackFilebeat.sh
./deployStackMetricbeat.sh
./deployStackPacketbeat.sh
./deployStackHeartbeat.sh
Beats 일괄배포
$ ./deployBeats.shBeats 일괄중지 스크립트 (removeBeats.sh)
removeBeats.sh Beats 일괄중지
#!/bin/bash

# docker stack rm auditbeat
docker stack rm filebeat
docker stack rm metricbeat
docker stack rm packetbeat
docker stack rm heartbeat
Beats 일괄중지
$ ./removeBeats.sh► 3. Filebeat 배포 (Beats 스크립트에 포함되서 설치됨)
Beats 일괄배포/중지 스크립트를 실행했다면 별도로 실행할 필요는 없다
https://www.elastic.co/kr/beats/filebeat
Filebeat Docker Compose (filebeat-docker-compose.yml)
filebeat-docker-compose.yml 스크립트 파일 참고
version: "3.8"

services:

  # How to Tune Elastic Beats Performance: A Practical Example with Batch Size, Worker Count, and More
  # https://www.elastic.co/blog/how-to-tune-elastic-beats-performance-a-practical-example-with-batch-size-worker-count-and-more?blade=tw&hulk=social
  filebeat:
    image: docker.elastic.co/beats/filebeat:${ELASTIC_VERSION}
    # https://github.com/docker/swarmkit/issues/1951
    hostname: "{{.Node.Hostname}}-filebeat"
    # Need to override user so we can access the log files, and docker.sock
    user: root
    networks:
      - elastic
    configs:
      - source: fb_config
        target: /usr/share/filebeat/filebeat.yml
      - source: fb_module_elasticsearch
        target: /usr/share/filebeat/modules.d/elasticsearch.yml
    volumes:
      - filebeat:/usr/share/filebeat/data
      - /var/run/docker.sock:/var/run/docker.sock
      # This is needed for filebeat to load container log path as specified in filebeat.yml
      - /var/lib/docker/containers/:/var/lib/docker/containers/:ro
      - /etc/localtime:/etc/localtime:ro

      # # This is needed for filebeat to load jenkins build log path as specified in filebeat.yml
      # - /var/lib/docker/volumes/jenkins_home/_data/jobs/:/var/lib/docker/volumes/jenkins_home/_data/jobs/:ro

      # This is needed for filebeat to load logs for system and auth modules
      - filebeat-log:/usr/share/filebeat/logs
      - /home/ubuntu/log/elasticsearch:/var/log/elasticsearch:ro
      # This is needed for filebeat to load logs for auditd module. you might have to install audit system
      # on ubuntu first (sudo apt-get install -y auditd audispd-plugins)
      #- /var/log/audit/:/var/log/audit/:ro
    environment:
      - ELASTICSEARCH_HOST=${ELASTICSEARCH_HOST}
      - KIBANA_HOST=${KIBANA_HOST}
      - ELASTICSEARCH_USERNAME=${ELASTICSEARCH_USERNAME}
      - ELASTICSEARCH_PASSWORD=${ELASTICSEARCH_PASSWORD}
      - TZ=Asia/Seoul
    # disable strict permission checks
    command: ["--strict.perms=false"]
    deploy:
      mode: global

networks:
  elastic:
    external: true
    name: host

volumes:
  filebeat:
  filebeat-log:
    driver: local
    driver_opts:
      type: none
      o: bind
      device: /home/ubuntu/log/filebeat

configs:
  fb_config:
    file: $PWD/elk/beats/filebeat/config/filebeat.yml
  fb_module_elasticsearch:
    file: $PWD/elk/beats/filebeat/config/modules.d/elasticsearch.yml
Filebeat 배포 스크립트 (deployStackFilebeat.sh)
deployStackFilebeat.sh filebeat stack 배포
#!/bin/bash

# Filebeat 배포 스크립트

# 사전 실행 스크립트
bash /home/ubuntu/docker-elastic/scripts/preload.sh

# 기본 환경 변수 가져오기
HOME='/home/ubuntu/docker-elastic'
ENV="${HOME}/env.sh"
source ${ENV}

#EXIST_NETWORK=$(docker network inspect msa-network -f "{{json .Id}}")
EXIST_NETWORK=$(docker network ls | grep $ELASTICSEARCH_USERNAME)
# 생성된 network가 없으면
if [ -z "$EXIST_NETWORK" ]; then
    docker network create --driver overlay --attachable $ELASTICSEARCH_USERNAME
fi

docker stack deploy --compose-file filebeat-docker-compose.yml filebeat


#curl -XGET -u ${ELASTICSEARCH_USERNAME}:${ELASTICSEARCH_PASSWORD} ${ELASTICSEARCH_HOST}':9200/_cat/indices?v&pretty'
$ ./deployStackFilebeat.shFilebeat 중지
$ docker stack rm filebeat► 4. Metricbeat 배포 (Beats 스크립트에 포함되서 설치됨)
Beats 일괄배포/중지 스크립트를 실행했다면 별도로 실행할 필요는 없다
https://www.elastic.co/kr/beats/metricbeat
Metricbeat Docker Compose (metricbeat-docker-compose.yml)
metricbeat-docker-compose.yml 스크립트 파일 참고
version: "3.8"

services:

  metricbeat:
    image: docker.elastic.co/beats/metricbeat:${ELASTIC_VERSION}
    # https://github.com/docker/swarmkit/issues/1951
    hostname: "{{.Node.Hostname}}-metricbeat"
    user: root
    networks:
      - elastic
    configs:
      - source: mb_config
        target: /usr/share/metricbeat/metricbeat.yml
    volumes:
      - /proc:/hostfs/proc:ro
      - /sys/fs/cgroup:/hostfs/sys/fs/cgroup:ro
      - /:/hostfs:ro
      - /var/run/docker.sock:/var/run/docker.sock
      - /etc/localtime:/etc/localtime:ro
      - metricbeat:/usr/share/metricbeat/data
    environment:
      - ELASTICSEARCH_HOST=${ELASTICSEARCH_HOST}
      - KIBANA_HOST=${KIBANA_HOST}
      - ELASTICSEARCH_USERNAME=${ELASTICSEARCH_USERNAME}
      - ELASTICSEARCH_PASSWORD=${ELASTICSEARCH_PASSWORD}
      - TZ=Asia/Seoul
    # disable strict permission checks
    command: ["--strict.perms=false", "-system.hostfs=/hostfs"]
    deploy:
      mode: global

networks:
  elastic:
    external: true
    # https://www.elastic.co/guide/en/beats/metricbeat/current/running-on-docker.html#monitoring-host
    name: host

volumes:
  metricbeat:

configs:
  mb_config:
    file: $PWD/elk/beats/metricbeat/config/metricbeat.yml
Metricbeat 배포 스크립트 (deployStackMetricbeat.sh)
deployStackMetricbeat.sh metricbeat stack 배포
#!/bin/bash

# 사전 실행 스크립트
bash /home/ubuntu/docker-elastic/scripts/preload.sh

# 기본 환경 변수 가져오기
HOME='/home/ubuntu/docker-elastic'
ENV="${HOME}/env.sh"
source ${ENV}

EXIST_NETWORK=$(docker network ls | grep $ELASTICSEARCH_USERNAME)
# 생성된 network가 없으면
if [ -z "$EXIST_NETWORK" ]; then
    docker network create --driver overlay --attachable $ELASTICSEARCH_USERNAME
fi

docker stack deploy --compose-file metricbeat-docker-compose.yml metricbeat
$ ./deployStackMetricbeat.shMetricbeat 중지
$ docker stack rm metricbeat► 5. Packetbeat 배포 (Beats 스크립트에 포함되서 설치됨)
Beats 일괄배포/중지 스크립트를 실행했다면 별도로 실행할 필요는 없다
https://www.elastic.co/kr/beats/packetbeat
Packetbeat Docker Compose (packetbeat-docker-compose.yml)
packetbeat-docker-compose.yml 스크립트 파일 참고
version: "3.8"

services:

  packetbeat:
    image: docker.elastic.co/beats/packetbeat:${ELASTIC_VERSION}
    # https://github.com/docker/swarmkit/issues/1951
    hostname: "{{.Node.Hostname}}-packetbeat"
    user: root
    networks:
      - elastic
    configs:
      - source: pb_config
        target: /usr/share/packetbeat/packetbeat.yml
    volumes:
      - packetbeat:/usr/share/packetbeat/data
      - /var/run/docker.sock:/var/run/docker.sock
      - /etc/localtime:/etc/localtime:ro
    environment:
      - ELASTICSEARCH_HOST=${ELASTICSEARCH_HOST}
      - KIBANA_HOST=${KIBANA_HOST}
      - ELASTICSEARCH_USERNAME=${ELASTICSEARCH_USERNAME}
      - ELASTICSEARCH_PASSWORD=${ELASTICSEARCH_PASSWORD}
      # Eagerly waiting for Docker 19.06 release which will bring --privileged flag to Docker
      # Swarm Mode https://github.com/moby/moby/issues/24862#issuecomment-451594187
      # support for capabilities https://github.com/moby/moby/pull/38380
      - TZ=Asia/Seoul
    cap_add:
      - NET_RAW
      - NET_ADMIN
    command: ["--strict.perms=false"]
    deploy:
      mode: global

networks:
  elastic:
    external: true
    name: host

volumes:
  packetbeat:

configs:
  pb_config:
    file: $PWD/elk/beats/packetbeat/config/packetbeat.yml
Packetbeat 배포 스크립트 (deployStackPacketbeat.sh)
deployStackPacketbeat.sh packetbeat stack 배포
#!/bin/bash

# 사전 실행 스크립트
bash /home/ubuntu/docker-elastic/scripts/preload.sh

# 기본 환경 변수 가져오기
HOME='/home/ubuntu/docker-elastic'
ENV="${HOME}/env.sh"
source ${ENV}

EXIST_NETWORK=$(docker network ls | grep $ELASTICSEARCH_USERNAME)
# 생성된 network가 없으면
if [ -z "$EXIST_NETWORK" ]; then
    docker network create --driver overlay --attachable $ELASTICSEARCH_USERNAME
fi

docker stack deploy --compose-file packetbeat-docker-compose.yml packetbeat
$ ./deployStackPacketbeat.shPacketbeat 중지
$ docker stack rm packetbeat► 6. Heartbeat 배포 (Beats 스크립트에 포함되서 설치됨)
Beats 일괄배포/중지 스크립트를 실행했다면 별도로 실행할 필요는 없다
https://www.elastic.co/kr/beats/heartbeat
Heartbeat Docker Compose (heartbeat-docker-compose.yml)
heartbeat-docker-compose.yml 스크립트 파일 참고
version: "3.8"

# https://www.elastic.co/guide/en/beats/auditbeat/current/auditbeat-overview.html
# Does not look like Auditd is supported in Alpine linux: https://github.com/linuxkit/linuxkit/issues/52

services:

  heartbeat:
    image: docker.elastic.co/beats/heartbeat:${ELASTIC_VERSION}
    # https://github.com/docker/swarmkit/issues/1951
    hostname: "{{.Node.Hostname}}-heartbeat"
    # Need to override user so we can access the log files, and docker.sock
    user: root
    # https://www.elastic.co/guide/en/beats/auditbeat/current/running-on-docker.html#_special_requirements
    # PID and CAP_ADD options are ignored as they are Not yet available in swarm mode at the moment.
    # Eagerly waiting for Docker 19.06 release which will bring --privileged flag to Docker
    # Swarm Mode https://github.com/moby/moby/issues/24862#issuecomment-451594187
    # support for capabilities https://github.com/moby/moby/pull/38380
    configs:
      - source: hb_config
        target: /usr/share/heartbeat/heartbeat.yml
    volumes:
      #Allows us to report on docker from the hosts information.
      - /var/run/docker.sock:/var/run/docker.sock
      - /etc/localtime:/etc/localtime:ro
      - heartbeat:/usr/share/heartbeat/data
      #Mount the Heartbeat configuration so users can make edits.
      # - ./beats/heartbeat/config/heartbeat.yml:/usr/share/heartbeat/heartbeat.yml:ro
    environment:
      - ELASTICSEARCH_HOST=${ELASTICSEARCH_HOST}
      - KIBANA_HOST=${KIBANA_HOST}
      - CLUSTER1_HOST=${CLUSTER1_HOST}
      - CLUSTER2_HOST=${CLUSTER2_HOST}
      - ELASTICSEARCH_USERNAME=${ELASTICSEARCH_USERNAME}
      - ELASTICSEARCH_PASSWORD=${ELASTICSEARCH_PASSWORD}
      - TZ=Asia/Seoul
    networks:
      - elastic
    command: ["--strict.perms=false"]
    deploy:
      mode: global

networks:
  elastic:
    external: true
    # https://www.elastic.co/guide/en/beats/metricbeat/current/running-on-docker.html#monitoring-host
    name: host

volumes:
  heartbeat:

configs:
  hb_config:
    file: $PWD/elk/beats/heartbeat/config/heartbeat.yml
Heartbeat 배포 스크립트 (deployStackHeartbeat.sh)
deployStackHeartbeat.sh heartbeat stack 배포
#!/bin/bash

# 사전 실행 스크립트
bash /home/ubuntu/docker-elastic/scripts/preload.sh

# 기본 환경 변수 가져오기
HOME='/home/ubuntu/docker-elastic'
ENV="${HOME}/env.sh"
source ${ENV}

EXIST_NETWORK=$(docker network ls | grep $ELASTICSEARCH_USERNAME)
# 생성된 network가 없으면
if [ -z "$EXIST_NETWORK" ]; then
    docker network create --driver overlay --attachable $ELASTICSEARCH_USERNAME
fi

docker stack deploy --compose-file heartbeat-docker-compose.yml heartbeat

# dashboard 활성 커맨드
#docker run \
#docker.elastic.co/beats/heartbeat:7.10.2 \
#setup -E setup.kibana.host=${KIBANA_HOST}:80 \
#-E output.elasticsearch.hosts=["${ELASTICSEARCH_HOST}:9200"] \
#-E setup.ilm.overwrite=true
$ ./deployStackHeartbeat.shHeartbeat 중지
$ docker stack rm heartbeat🚫 7. Auditbeat 배포 (사용안함)
Auditbeat는 pid 설정 문제로 Docker Swarm으로 구동하기 힘들고 각각 서버에서 단독으로 구성해줘야 됨
https://www.elastic.co/kr/beats/auditbeat
- auditbeat-docker-compose.yml 스크립트 파일 참고
- deployStackAuditbeat.sh auditbeat stack 배포
$ ./deployStackAuditbeat.sh'DevOps' 카테고리의 다른 글
| [Docker Swarm ELK Stack] ELK 모니터링 및 관리 (Elasticvue, Kibnana) (0) | 2024.07.20 |
|---|---|
| [Docker Swarm ELK Stack] AWS EC2(Ubuntu) ELK AMI 초기 셋팅 (0) | 2024.07.20 |
| [Docker Compose] Kong Gateway(3.7.X) Local 개발 환경 구축 (0) | 2024.07.15 |
| [Docker Swarm ELK Stack] AWS EC2(Ubuntu) 초기 환경 셋팅(Docker, zsh, oh-my-zsh, 테마, 랜덤 이모지 프롬프트) (0) | 2023.09.02 |
| [Docker] docker ps 명령어 및 옵션 사용법 (0) | 2021.08.12 |

댓글